使用 React Native 桌面上的表格
React Native for Windows + macOS[^1] 是支持原生应用的 React Native 后端。Windows 后端构建可在 Windows 10 / 11、Xbox 和其他支持的平台上使用的应用。macOS 后端支持 macOS 10.14 SDK
¥React Native for Windows + macOS[^1] is a backend for React Native that supports native apps. The Windows backend builds apps for use on Windows 10 / 11, Xbox, and other supported platforms. The macOS backend supports macOS 10.14 SDK
SheetJS 是一个用于从电子表格读取和写入数据的 JavaScript 库。
¥SheetJS is a JavaScript library for reading and writing data from spreadsheets.
该演示使用 React Native for Windows + macOS 和 SheetJS 来处理电子表格。我们将探索如何在 React Native 桌面应用中加载 SheetJS,并创建用于从计算机中选择和读取文件的原生模块。
¥This demo uses React Native for Windows + macOS and SheetJS to process spreadsheets. We'll explore how to load SheetJS in a React Native deskktop app and create native modules for selecting and reading files from the computer.
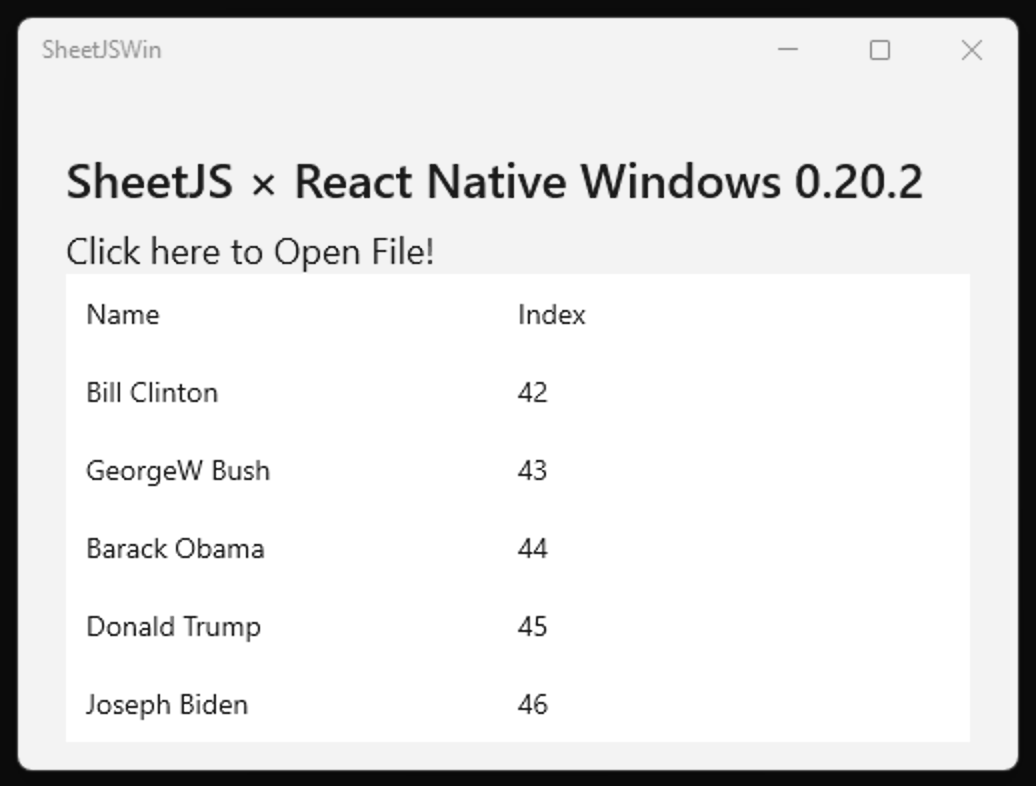
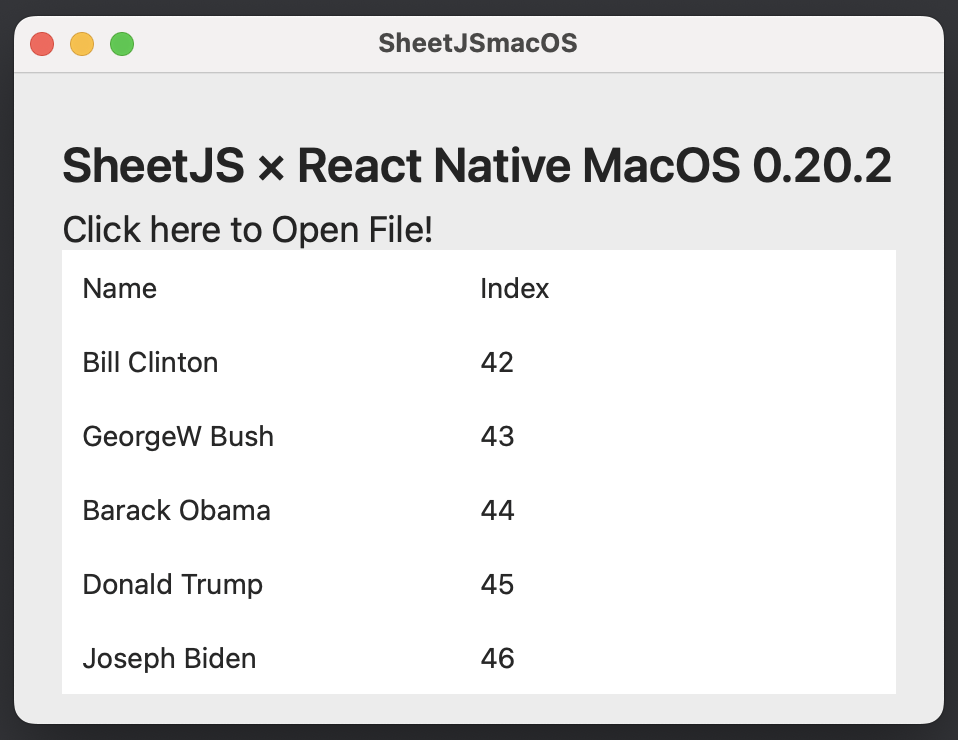
Windows 和 macOS 演示创建的应用如下图所示:
¥The Windows and macOS demos create apps that look like the screenshots below:
| Windows | macOS |
|---|---|
|
|
本 demo 在以下环境下进行了测试:
¥This demo was tested in the following environments:
| 操作系统和版本 | 架构 | 注册护士平台 | 日期 |
|---|---|---|---|
| Windows 11 C++ | win11-x64 | v0.78.8 | 2025-06-08 |
| Windows 11 C# | win11-x64 | v0.78.8 | 2025-06-08 |
| Windows 11 C++ | win11-arm | v0.77.2 | 2025-02-23 |
| Windows 11 C# | win11-arm | v0.77.2 | 2025-02-23 |
| MacOS 15.3.2 | darwin-x64 | v0.76.7 | 2025-03-31 |
| MacOS 14.5 | darwin-arm | v0.78.3 | 2025-06-14 |
本节介绍适用于桌面应用的 React Native。对于 iOS 和 Android 应用,检查移动演示
¥This section covers React Native for desktop applications. For iOS and Android applications, check the mobile demo
Windows + macOS 命令的 React Native 包括遥测�,没有适当的免责声明或全局选择退出。
¥React Native for Windows + macOS commands include telemetry without proper disclaimer or global opt-out.
抑制遥测的推荐方法是显式传递 --no-telemetry 标志。已知以下命令支持该标志:
¥The recommended approach for suppressing telemetry is explicitly passing the
--no-telemetry flag. The following commands are known to support the flag:
-
使用
react-native-macos-init初始化 macOS 项目¥Initializing a macOS project with
react-native-macos-init -
使用
react-native-windows-init初始化 Windows 项目¥Initializing a Windows project with
react-native-windows-init -
使用
react-native run-windows运行 Windows 应用¥Running Windows apps with
react-native run-windows
集成详情
¥Integration Details
SheetJS NodeJS 模块 可以从应用中的任何组件或脚本导入。
¥The SheetJS NodeJS Module can be imported from any component or script in the app.
内部状态
¥Internal State
为简单起见,该演示使用 "数组的数组"[^2] 作为内部状态。
¥For simplicity, this demo uses an "Array of Arrays"[^2] as the internal state.
| Spreadsheet | Array of Arrays |
|---|---|
| |
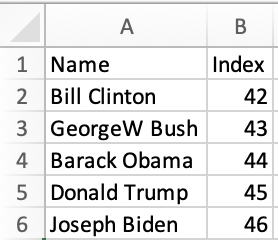
结构中的每个数组对应一行。
¥Each array within the structure corresponds to one row.
状态使用以下代码片段进行初始化:
¥The state is initialized with the following snippet:
const [ aoa, setAoA ] = useState(["SheetJS".split(""), "5433795".split("")]);
更新状态
¥Updating State
从 SheetJS 工作表对象开始,带有 header 选项的 sheet_to_json[^3] 可以生成数组的数组:
¥Starting from a SheetJS worksheet object, sheet_to_json[^3] with the header
option can generate an array of arrays:
/* assuming `wb` is a SheetJS workbook */
function update_state(wb) {
  /* convert first worksheet to AOA */
  const wsname = wb.SheetNames[0];
  const ws = wb.Sheets[wsname];
  const data = utils.sheet_to_json(ws, {header:1});

  /* update state */
  setAoA(data);
}
显示数据
¥Displaying Data
该演示使用 react-native 中的原生 View 元素来显示数据。
¥The demos use native View elements from react-native to display data.
Explanation (click to show)
Since some spreadsheets may have empty cells between cells containing data, looping over the rows may skip values!
This example explicitly loops over the row and column indices.
Determining the Row Indices
The first row index is 0 and the last row index is aoa.length - 1. This
corresponds to the for loop:
for(var R = 0; R < aoa.length; ++R) {/* ... */}
Determining the Column Indices
The first column index is 0 and the last column index must be calculated from
the maximum column index across every row.
Traditionally this would be implemented in a for loop:
var max_col_index = 0;
for(var R = 0; R < aoa.length; ++R) {
  if(!aoa[R]) continue;
  max_col_index = Math.max(max_col_index, aoa[R].length - 1);
}
Array#reduce simplifies this calculation:
const max_col_index = aoa.reduce((C,row) => Math.max(C,row.length), 1) - 1;
Looping from 0 to N-1
Traditionally a for loop would be used:
var data = [];
for(var R = 0; R < max_row; ++R) data[R] = func(R);
For creating an array of React Native components, Array.from should be used:
var children = Array.from({length: max_row}, (_,R) => ( <Row key={R} /> ));
渲染数据的相关部分如下所示:
¥The relevant parts for rendering data are shown below:
import React, { useState, type FC } from 'react';
import { SafeAreaView, ScrollView, Text, View } from 'react-native';

const App: FC = () => {
  const [ aoa, setAoA ] = useState(["SheetJS".split(""), "5433795".split("")]);
  const max_cols = aoa.reduce((acc,row) => Math.max(acc,row.length),1);

  return (
    <SafeAreaView>
      <ScrollView contentInsetAdjustmentBehavior="automatic">
        {/* Table Container */}
        <View>{
          /* Loop over the row indices */
          Array.from({length: aoa.length}, (_, R) => (
            /* Table Row */
            <View key={R}>{
              /* Loop over the column indices */
              Array.from({length: max_cols}, (_, C) => (
                /* Table Cell */
                <View key={C}>
                  <Text>{String(aoa?.[R]?.[C]??"")}</Text>
                </View>
              ))
            }</View>
          ))
        }</View>
      </ScrollView>
    </SafeAreaView>
  );
};
export default App;
原生模块
¥Native Modules
与 React Native 的移动版本一样,基础 SDK 不提供文件操作。这些示例包括适用于 Windows 和 macOS 的原生代码。
¥As with the mobile versions of React Native, file operations are not provided by the base SDK. The examples include native code for both Windows and macOS.
Windows 演示假定你对 C++ / C# 有一定的了解,macOS 演示则假定你对 Objective-C 有一定的了解。
¥The Windows demo assumes some familiarity with C++ / C# and the macOS demo assumes some familiarity with Objective-C.
Windows + macOS 的 React Native 使用 Turbo Modules[^4] 进行原生集成。
¥React Native for Windows + macOS use Turbo Modules[^4] for native integrations.
该演示定义了一个名为 DocumentPicker 的原生模块。
¥The demos define a native module named DocumentPicker.
读取文件
¥Reading Files
演示中的原生模块定义了一个 PickAndRead 函数,该函数将显示文件选择器、读取文件内容并返回 Base64 字符串。
¥The native modules in the demos define a PickAndRead function that will show
the file picker, read the file contents, and return a Base64 string.
只有主 UI 线程可以显示文件选择器。这与 Web 平台中的 Web Worker DOM 访问限制类似。
¥Only the main UI thread can show file pickers. This is similar to Web Worker DOM access limitations in the Web platform.
集成
¥Integration
该模块可以从 Turbo 模块注册表中引用:
¥This module can be referenced from the Turbo Module Registry:
import { read } from 'xlsx';
import { getEnforcing } from 'react-native/Libraries/TurboModule/TurboModuleRegistry';
const DocumentPicker = getEnforcing('DocumentPicker');


/* ... in some event handler ... */
async() => {
  const b64 = await DocumentPicker.PickAndRead();
  const wb = read(b64);
  // DO SOMETHING WITH `wb` HERE
}
原生模块
¥Native Module
- Windows
- macOS
React Native Windows 支持 C++ 和 C# 项目。
¥React Native Windows supports C++ and C# projects.
- C#
- C++
[ReactMethod("PickAndRead")]
public async void PickAndRead(IReactPromise<string> result) {
  /* perform file picker action in the UI thread */
  context.Handle.UIDispatcher.Post(async() => { try {
    /* create file picker */
    var picker = new FileOpenPicker();
    picker.SuggestedStartLocation = PickerLocationId.DocumentsLibrary;
    picker.FileTypeFilter.Add(".xlsx");
    picker.FileTypeFilter.Add(".xls");

    /* show file picker */
    var file = await picker.PickSingleFileAsync();
    if(file == null) throw new Exception("File not found");

    /* read data and return base64 string */
    var buf = await FileIO.ReadBufferAsync(file);
    result.Resolve(CryptographicBuffer.EncodeToBase64String(buf));
  } catch(Exception e) { result.Reject(new ReactError { Message = e.Message }); }});
}
REACT_METHOD(PickAndRead);
void PickAndRead(ReactPromise<winrt::hstring> promise) noexcept {
  auto prom = promise;
  /* perform file picker action in the UI thread */
  context.UIDispatcher().Post([prom = std::move(prom)]()->winrt::fire_and_forget {
    auto p = prom; // promise -> prom -> p dance avoids promise destruction

    /* create file picker */
    FileOpenPicker picker;
    picker.SuggestedStartLocation(PickerLocationId::DocumentsLibrary);
    picker.FileTypeFilter().Append(L".xlsx");
    picker.FileTypeFilter().Append(L".xls");

    /* show file picker */
    StorageFile file = co_await picker.PickSingleFileAsync();
    if(file == nullptr) { p.Reject("File not Found"); co_return; }

    /* read data and return base64 string */
    auto buf = co_await FileIO::ReadBufferAsync(file);
    p.Resolve(CryptographicBuffer::EncodeToBase64String(buf));
    co_return;
  });
}
React Native macOS 支持 Objective-C 模块
¥React Native macOS supports Objective-C modules
/* the resolve/reject is projected on the JS side as a Promise */
RCT_EXPORT_METHOD(PickAndRead:(RCTPromiseResolveBlock)resolve rejecter:(RCTPromiseRejectBlock)reject) {
  /* perform file picker action in the UI thread */
  RCTExecuteOnMainQueue(^{
    /* create file picker */
    NSOpenPanel *panel = [NSOpenPanel openPanel];
    [panel setCanChooseDirectories:NO];
    [panel setAllowsMultipleSelection:NO];
    [panel setMessage:@"Select a spreadsheet to read"];

    /* show file picker */
    [panel beginWithCompletionHandler:^(NSInteger result){
      if (result == NSModalResponseOK) {
        /* read data and return base64 string */
        NSURL *selected = [[panel URLs] objectAtIndex:0];
        NSFileHandle *hFile = [NSFileHandle fileHandleForReadingFromURL:selected error:nil];
        if(hFile) {
          NSData *data = [hFile readDataToEndOfFile];
          resolve([data base64EncodedStringWithOptions:0]);
        } else reject(@"read_failure", @"Could not read selected file!", nil);
      } else reject(@"select_failure", @"No file selected!", nil);
    }];
  });
}
Windows 演示
¥Windows Demo
该过程结束时没有简单的独立可执行文件。
¥There is no simple standalone executable file at the end of the process.
¥The official documentation describes distribution strategies
React Native Windows 支持用 C++ 或 C# 编写原生代码。该演示已针对两种应用类型进行了测试。
¥React Native Windows supports writing native code in C++ or C#. This demo has been tested against both application types.
-
安装 开发依赖。
¥Install the development dependencies.
在 React Native 的早期版本中,需要 NodeJS v16。应该使用 nvm-windows 之类的工具来切换 NodeJS 版本。
¥In earlier versions of React Native, NodeJS v16 was required. A tool like
nvm-windows should be
used to switch the NodeJS version.
Installation Notes (click to show)
When the demo was last tested, a PowerShell script installed dependencies:
Set-ExecutionPolicy Unrestricted -Scope Process -Force;
iex (New-Object System.Net.WebClient).DownloadString('https://aka.ms/rnw-vs2022-deps.ps1');
If any step fails to install, open the dependencies page and expand "Manual setup instructions" to find instructions for manual installation.
Even though React Native for Windows recommends enabling "Developer Mode", it is not a requirement for this demo.
项目设置
¥Project Setup
-
使用 React Native
0.78.2创建一个新项目:¥Create a new project using React Native
0.78.2:
npx -y @react-native-community/cli@15 init SheetJSWin --version="0.78.2"
cd SheetJSWin
npm install --save react-native-windows@0.78.8
此演示的旧版本使用了 react-native 包。init 命令已正式弃用。
¥Older versions of this demo used the react-native package. The init command
was officially deprecated.
React Native 现在建议使用 @react-native-community/cli。版本控制方案与 react-native.[^5] 根本不同
¥React Native now recommends using @react-native-community/cli. The versioning
scheme is fundamentally different from react-native.[^5]
-
创建应用的 Windows 部分:
¥Create the Windows part of the application:
- C#
- C++
npx react-native init-windows --no-telemetry --overwrite --template old/uwp-cs-app
npx react-native init-windows --no-telemetry --overwrite --template old/uwp-cpp-app
此演示的旧版本使用了 react-native-windows-init 包。此包不支持 React Native 0.77。官方说明现在建议直接安装 react-native-windows。
¥Older versions of this demo used the react-native-windows-init package. This
package does not support React Native 0.77. The official instructions now
recommend directly installing react-native-windows.
上次测试此演示时,没有使用 React Native "新架构" 的 C# 应用模板。为了保持一致性,C# 和 C++ 演示均使用 "旧架构" 进行测试。
¥When this demo was last tested, there was no template for a C# application using the React Native "New Architecture". For consistency, both the C# and C++ demos are tested using the "Old Architecture".
-
安装 SheetJS 库:
¥Install the SheetJS library:
npm i --save https://cdn.sheetjs.com/xlsx-0.20.3/xlsx-0.20.3.tgz
-
为确保应用正常运行,请启动应用:
¥To ensure that the app works, launch the app:
- x64 (64-bit Windows)
- ARM64
npx react-native run-windows --no-telemetry
当在 Windows 11 中测试演示时,运行步骤失败并显示消息:
¥When the demo was tested in Windows 11, the run step failed with the message:
找不到 Windows SDK 版本
10.0.22621.0¥The Windows SDK version
10.0.22621.0was not found
可以通过 Visual Studio Installer 安装特定的 Windows SDK 版本。
¥Specific Windows SDK versions can be installed through Visual Studio Installer.
npx react-native run-windows --no-telemetry --arch=X86
ARM64 二进制文件通常是用
¥The ARM64 binary is normally built with
npx react-native run-windows --no-telemetry --arch=ARM64
当此演示上次在 Windows 11 ARM 上测试时,构建失败。
¥When this demo was last tested on Windows 11 ARM, the build failed.
由于它影响入门项目,因此它是 ARM64 React Native Windows 中的一个错误
¥As it affects the starter project, it is a bug in ARM64 React Native Windows
在 PowerShell 中,该命令将失败并显示 msbuild 错误:
¥In PowerShell, the command will fail with msbuild errors:
× Could not find MSBuild with VCTools for Visual Studio 17.11.0 or later. Make sure all required components have been installed
这些命令必须在 "原生工具命令提示符" 环境中运行!
¥The commands must be run in a "Native Tools Command Prompt"!
原生模块
¥Native Module
- C#
- C++
-
下载
DocumentPicker.cs并保存到windows\SheetJSWin\DocumentPicker.cs。¥Download
DocumentPicker.csand save towindows\SheetJSWin\DocumentPicker.cs.
- PowerShell
- WSL Bash / Command Prompt
iwr -Uri https://xlsx.nodejs.cn/reactnative/DocumentPicker.cs -OutFile windows/SheetJSWin/DocumentPicker.cs
curl -Lo windows/SheetJSWin/DocumentPicker.cs https://xlsx.nodejs.cn/reactnative/DocumentPicker.cs
-
编辑
windows\SheetJSWin\SheetJSWin.csproj以引用DocumentPicker.cs¥Edit
windows\SheetJSWin\SheetJSWin.csprojto referenceDocumentPicker.cs
在文件中搜索 ReactPackageProvider.cs。会有一个例子。在该实例之前添加高亮的行:
¥Search for ReactPackageProvider.cs in the file. There will be one instance.
Add the highlighted line just before that instance:
    <Compile Include="DocumentPicker.cs" />
    <Compile Include="ReactPackageProvider.cs" />
  </ItemGroup>
-
下载
DocumentPicker.h并保存到windows\SheetJSWin\DocumentPicker.h。¥Download
DocumentPicker.hand save towindows\SheetJSWin\DocumentPicker.h.
- PowerShell
- WSL Bash / Command Prompt
iwr -Uri https://xlsx.nodejs.cn/reactnative/DocumentPicker.h -OutFile windows/SheetJSWin/DocumentPicker.h
curl -Lo windows/SheetJSWin/DocumentPicker.h https://xlsx.nodejs.cn/reactnative/DocumentPicker.h
-
将高亮的行添加到
windows\SheetJSWin\ReactPackageProvider.cpp:¥Add the highlighted line to
windows\SheetJSWin\ReactPackageProvider.cpp:
#include "ReactPackageProvider.h"
#include "DocumentPicker.h"
#include "NativeModules.h"
现在原生模块将添加到应用中。
¥Now the native module will be added to the app.
应用
¥Application
- PowerShell
- WSL Bash / Command Prompt
rm App.js
iwr -Uri https://xlsx.nodejs.cn/reactnative/rnw/App.tsx -OutFile App.tsx
rm App.js
curl -LO https://xlsx.nodejs.cn/reactnative/rnw/App.tsx
如果 App.js 不存在,rm 命令可能会失败。可以忽略该错误。
¥The rm command may fail if App.js does not exist. That error can be ignored.
-
再次启动应用:
¥Launch the app again:
- x64 (64-bit Windows)
- ARM64
npx react-native run-windows --no-telemetry
npx react-native run-windows --no-telemetry --arch=X86
ARM64 二进制文件通常是用
¥The ARM64 binary is normally built with
npx react-native run-windows --no-telemetry --arch=ARM64
当此演示上次在 Windows 11 ARM 上测试时,构建失败。
¥When this demo was last tested on Windows 11 ARM, the build failed.
由于它影响入门项目,因此它是 ARM64 React Native Windows 中的一个错误
¥As it affects the starter project, it is a bug in ARM64 React Native Windows
-
下载 https://xlsx.nodejs.cn/pres.xlsx。
¥Download https://xlsx.nodejs.cn/pres.xlsx.
-
在应用中,单击 "单击此处打开文件!" 并使用文件选择器选择
pres.xlsx。 该应用将刷新并显示文件中的数据。¥In the app, click "Click here to Open File!" and use the file picker to select
pres.xlsx. The app will refresh and display the data from the file.
macOS 演示
¥macOS Demo
-
请遵循 "React Native CLI 快速入门" + "苹果系统" + "iOS" 的 React Native 文档中的 "设置开发环境"[^6] 指南。
¥Follow the "Setting up the development environment"[^6] guide in the React Native documentation for "React Native CLI Quickstart" + "macOS" + "iOS".
项目设置
¥Project Setup
-
使用 React Native
0.78.2创建一个新的 React Native 项目:¥Create a new React Native project using React Native
0.78.2:
npx -y @react-native-community/cli@15 init SheetJSmacOS --version 0.78.2
cd SheetJSmacOS
如果提示安装 CocoaPods,请输入 Y。
¥If prompted to install CocoaPods, type Y.
此演示的旧版本使用了 react-native 包。init 命令已正式弃用。
¥Older versions of this demo used the react-native package. The init command
was officially deprecated.
React Native 现��在建议使用 @react-native-community/cli。版本控制方案与 react-native.[^5] 根本不同
¥React Native now recommends using @react-native-community/cli. The versioning
scheme is fundamentally different from react-native.[^5]
-
创建应用的 MacOS 部分:
¥Create the MacOS part of the application:
npx -y react-native-macos-init --no-telemetry
cd macos; pod install; cd ..
在一些 macOS 测试中,构建因 visionos 错误而失败:
¥In some macOS tests, the build failed due to visionos errors:
[!] Failed to load 'React-RCTFabric' podspec:
[!] Invalid `React-RCTFabric.podspec` file: undefined method `visionos' for #<Pod::Specification name="React-RCTFabric">.
通过将 CocoaPods 升级到 1.15.2 解决了此错误:
¥This error was resolved by upgrading CocoaPods to 1.15.2:
sudo gem install cocoapods
升级 CocoaPods 后,重新安装项目 pod:
¥After upgrading CocoaPods, reinstall the project pods:
cd macos
pod install
cd ..
-
安装 SheetJS 库:
¥Install the SheetJS library:
npm i --save https://cdn.sheetjs.com/xlsx-0.20.3/xlsx-0.20.3.tgz
-
为确保应用正常运行,请启动应用:
¥To ensure that the app works, launch the app:
npx react-native run-macos
从 Dock 中关闭正在运行的应用,然后关闭 Metro 终端窗口。
¥Close the running app from the dock and close the Metro terminal window.
在某些测试运行中,应用失败并出现警告
¥In some test runs, the app failed with a warning
不存在打包包 URL。
¥No bundle URL present.
由于这会影响默认应用,因此这是 React Native macOS 中的一个错误!
¥As this affects the default app, this is a bug in React Native macOS!
生产构建按预期工作。如果出现错误,请单击 "关闭" 以消除错误,关闭应用,然后单击 进行发布构建。
¥The production builds work as expected. If there are errors, click "Dismiss" to dismiss the error, close the app, and make a release build.
原生模块
¥Native Module
-
创建包含以下内容的文件
macos/SheetJSmacOS-macOS/RCTDocumentPicker.h:¥Create the file
macos/SheetJSmacOS-macOS/RCTDocumentPicker.hwith the following contents:
#import <React/RCTBridgeModule.h>
@interface RCTDocumentPicker : NSObject <RCTBridgeModule>
@end
-
创建包含以下内容的文件
macos/SheetJSmacOS-macOS/RCTDocumentPicker.m:¥Create the file
macos/SheetJSmacOS-macOS/RCTDocumentPicker.mwith the following contents:
#import <Foundation/Foundation.h>
#import <React/RCTUtils.h>

#import "RCTDocumentPicker.h"

@implementation RCTDocumentPicker

RCT_EXPORT_MODULE();

RCT_EXPORT_METHOD(PickAndRead:(RCTPromiseResolveBlock)resolve rejecter:(RCTPromiseRejectBlock)reject)
{
  RCTExecuteOnMainQueue(^{
    NSOpenPanel *panel = [NSOpenPanel openPanel];
    [panel setCanChooseDirectories:NO];
    [panel setAllowsMultipleSelection:NO];
    [panel setMessage:@"Select a spreadsheet to read"];

    [panel beginWithCompletionHandler:^(NSInteger result){
      if (result == NSModalResponseOK) {
        NSURL *selected = [[panel URLs] objectAtIndex:0];
        NSFileHandle *hFile = [NSFileHandle fileHandleForReadingFromURL:selected error:nil];
        if(hFile) {
          NSData *data = [hFile readDataToEndOfFile];
          resolve([data base64EncodedStringWithOptions:0]);
        } else reject(@"read_failure", @"Could not read selected file!", nil);
      } else reject(@"select_failure", @"No file selected!", nil);
    }];
  });
}
@end
-
编辑项目文件
macos/SheetJSmacOS.xcodeproj/project.pbxproj。¥Edit the project file
macos/SheetJSmacOS.xcodeproj/project.pbxproj.
有四个地方必须添加行:
¥There are four places where lines must be added:
A) 复制高亮的行并粘贴到 /* Begin PBXBuildFile section */ 下:
¥A) Copy the highlighted line and paste under /* Begin PBXBuildFile section */:
/* Begin PBXBuildFile section */
    4717DC6A28CC499A00A9BE56 /* RCTDocumentPicker.m in Sources */ = {isa = PBXBuildFile; fileRef = 4717DC6928CC499A00A9BE56 /* RCTDocumentPicker.m */; };
B) 复制高亮的行并粘贴到 /* Begin PBXFileReference section */ 下:
¥B) Copy the highlighted lines and paste under /* Begin PBXFileReference section */:
/* Begin PBXFileReference section */
    4717DC6828CC495400A9BE56 /* RCTDocumentPicker.h */ = {isa = PBXFileReference; lastKnownFileType = sourcecode.c.h; name = RCTDocumentPicker.h; path = "SheetJSMacOS-macOS/RCTDocumentPicker.h"; sourceTree = "<group>"; };
    4717DC6928CC499A00A9BE56 /* RCTDocumentPicker.m */ = {isa = PBXFileReference; lastKnownFileType = sourcecode.c.objc; name = RCTDocumentPicker.m; path = "SheetJSMacOS-macOS/RCTDocumentPicker.m"; sourceTree = "<group>"; };
C) 目标是为 macOS 目标添加对 PBXSourcesBuildPhase 块的引用。要确定这一点,请在 PBXNativeTarget section 中查找带有注释 SheetJSmacOS-macOS 的块:
¥C) The goal is to add a reference to the PBXSourcesBuildPhase block for the
macOS target. To determine this, look in the PBXNativeTarget section for
a block with the comment SheetJSmacOS-macOS:
/* Begin PBXNativeTarget section */
...
      productType = "com.apple.product-type.application";
    };
    514201482437B4B30078DB4F /* SheetJSmacOS-macOS */ = {
      isa = PBXNativeTarget;
...
/* End PBXNativeTarget section */
在块中,查找 buildPhases 并找到 Sources 的十六进制字符串:
¥Within the block, look for buildPhases and find the hex string for Sources:
    514201482437B4B30078DB4F /* SheetJSmacOS-macOS */ = {
      isa = PBXNativeTarget;
      buildConfigurationList = 5142015A2437B4B40078DB4F /* Build configuration list for PBXNativeTarget "SheetJSmacOS-macOS" */;
      buildPhases = (
        1A938104A937498D81B3BD3B /* [CP] Check Pods Manifest.lock */,
        381D8A6F24576A6C00465D17 /* Start Packager */,
        514201452437B4B30078DB4F /* Sources */,
        514201462437B4B30078DB4F /* Frameworks */,
        514201472437B4B30078DB4F /* Resources */,
        381D8A6E24576A4E00465D17 /* Bundle React Native code and images */,
        3689826CA944E2EF44FCBC17 /* [CP] Copy Pods Resources */,
      );
在文件中搜索该十六进制字符串(在我们的示例中为 514201452437B4B30078DB4F),它应该显示在 PBXSourcesBuildPhase 部分中。在 files 列表中,添加高亮的行:
¥Search for that hex string (514201452437B4B30078DB4F in our example) in the
file and it should show up in a PBXSourcesBuildPhase section. Within the
files list, add the highlighted line:
    514201452437B4B30078DB4F /* Sources */ = {
      isa = PBXSourcesBuildPhase;
      buildActionMask = 2147483647;
      files = (
        4717DC6A28CC499A00A9BE56 /* RCTDocumentPicker.m in Sources */,
        514201582437B4B40078DB4F /* main.m in Sources */,
        5142014D2437B4B30078DB4F /* AppDelegate.mm in Sources */,
      );
      runOnlyForDeploymentPostprocessing = 0;
    };
D) 目标是将文件引用添加到 "主要群体"。搜索 /* Begin PBXProject section */,应该有一个 Project 对象。在项目对象中,查找 mainGroup:
¥D) The goal is to add file references to the "main group". Search for
/* Begin PBXProject section */ and there should be one Project object.
Within the project object, look for mainGroup:
/* Begin PBXProject section */
    83CBB9F71A601CBA00E9B192 /* Project object */ = {
      isa = PBXProject;
...
        Base,
      );
      mainGroup = 83CBB9F61A601CBA00E9B192;
      productRefGroup = 83CBBA001A601CBA00E9B192 /* Products */;
...
/* End PBXProject section */
在文件中搜索该十六进制字符串(在我们的示例中为 83CBB9F61A601CBA00E9B192),它应该显示在 PBXGroup 部分中。在 children 中,添加高亮的行:
¥Search for that hex string (83CBB9F61A601CBA00E9B192 in our example) in the
file and it should show up in a PBXGroup section. Within children, add the
highlighted lines:
    83CBB9F61A601CBA00E9B192 = {
      isa = PBXGroup;
      children = (
        4717DC6828CC495400A9BE56 /* RCTDocumentPicker.h */,
        4717DC6928CC499A00A9BE56 /* RCTDocumentPicker.m */,
        5142014A2437B4B30078DB4F /* SheetJSmacOS-macOS */,
-
为了确保该应用仍然有效,请再次启动该应用:
¥To ensure that the app still works, launch the app again:
npx react-native run-macos
如果应用运行但没有显示窗口,请清除缓存并重试:
¥If the app runs but no window is displayed, clear caches and try again:
npx react-native clean --include metro,watchman
npx react-native run-macos
从 Dock 中关闭正在运行的应用,然后关闭 Metro 终端窗口。
¥Close the running app from the dock and close the Metro terminal window.
应用
¥Application
curl -LO https://xlsx.nodejs.cn/reactnative/rnm/App.tsx
-
将 https://xlsx.nodejs.cn/pres.xlsx 下载到下载文件夹。
¥Download https://xlsx.nodejs.cn/pres.xlsx to the Downloads folder.
开发
¥Development
在某些测试运行中,开发模式应用失败并出现 "打包包网址" 错误:
¥In some test runs, the development mode app failed with a "bundle URL" error:
不存在打包包 URL。
¥No bundle URL present.
"生产" 部分涵盖发布版本和测试。
¥The "Production" section covers release builds and tests.
-
再次启动应用:
¥Launch the app again:
npx react-native run-macos
-
单击 "单击此处打开文件!" 并使用文件选择器从下载文件夹中选择
pres.xlsx。¥Click "Click here to Open File!" and use the file picker to select
pres.xlsxfrom the Downloads folder.
该应用将刷新并显示文件中的数据。
¥The app will refresh and display the data from the file.
从 Dock 中关闭正在运行的应用,然后关闭 Metro 终端窗口。
¥Close the running app from the dock and close the Metro terminal window.
生产
¥Production
-
删除所有现有的
SheetJSmacOS.app发行版本。它们将存储在~/Library/Developer/Xcode/DerivedData文件夹中。¥Remove all existing
SheetJSmacOS.apprelease builds. They will be stored in the~/Library/Developer/Xcode/DerivedDatafolder.
find ~/Library/Developer/Xcode/DerivedData -name SheetJSmacOS.app | grep Release | while read x; do rm -rf "$x"; done
-
进行发布版本:
¥Make a release build:
xcodebuild -workspace macos/SheetJSmacOS.xcworkspace -scheme SheetJSmacOS-macOS -config Release
上次测试演示时,生成的应用的路径显示在终端中。搜索 Release/SheetJSmacOS.app 并查找 touch -c:
¥When the demo was last tested, the path to the generated app was displayed in
the terminal. Search for Release/SheetJSmacOS.app and look for touch -c:
/usr/bin/touch -c /Users/sheetjs/Library/Developer/Xcode/DerivedData/SheetJSmacOS-abcdefghijklmnopqrstuvwxyzab/Build/Products/Release/SheetJSmacOS.app
如果没有实例,则可以在 DerivedData 文件夹中找到应用路径:
¥If there are no instances, the app path can be found in the DerivedData folder:
find ~/Library/Developer/Xcode/DerivedData -name SheetJSmacOS.app | grep Release
在较早的测试运行中,xcodebuild 失败。滚动日志显示:
¥In an older test run, xcodebuild failed. Scrolling through the log reveals:
                Welcome to Metro v0.80.12
              Fast - Scalable - Integrated


node:events:497
      throw er; // Unhandled 'error' event
      ^

Error: EMFILE: too many open files, watch
    at FSWatcher._handle.onchange (node:internal/fs/watchers:207:21)
必须增加文件描述符限制 [^7]。
¥The file descriptor limits must be increased[^7].
sudo sysctl -w kern.maxfiles=10485760
sudo sysctl -w kern.maxfilesperproc=1048576
进行此更改后,强制重置 watchman:
¥After making this change, forcefully reset watchman:
watchman shutdown-server
watchman watch-del-all
-
运行发布应用:
¥Run the release app:
open -a "$(find ~/Library/Developer/Xcode/DerivedData -name SheetJSmacOS.app | grep Release | head -n 1)"
-
单击 "单击此处打开文件!" 并使用文件选择器从下载文件夹中选择
pres.xlsx。¥Click "Click here to Open File!" and use the file picker to select
pres.xlsxfrom the Downloads folder.
该应用将刷新并显示文件中的数据。
¥The app will refresh and display the data from the file.
[^1]: 官方网站 涵盖两个平台,但 Windows 和 苹果系统 有单独的存储库
¥The official website covers both platforms, but there are separate repositories for Windows and macOS
[^2]: 见 API 参考中的 "数组的数组"
¥See "Array of Arrays" in the API reference
[^3]: 见 "数组输出" 于 "实用函数"
¥See "Array Output" in "Utility Functions"
[^4]: 请参阅 React Native 文档中的 "Turbo Native 模块"。
¥See "Turbo Native Modules" in the React Native documentation.
[^5]: 请参阅 CLI 项目存储库中的 兼容性表,以确定给定 react-native 版本需要哪个版本的 @react-native-community/cli。
¥See the compatibility table in the CLI project repository to determine which version of @react-native-community/cli is required for a given react-native version.
[^6]: 请参阅 React Native 文档中的 "设置开发环境"。选择 "React Native CLI 快速入门" 选项卡,然后选择开发操作系统 "苹果系统" 和目标操作系统 "iOS"。
¥See "Setting up the development environment" in the React Native documentation. Select the "React Native CLI Quickstart" tab and choose the Development OS "macOS" and the Target OS "iOS".
[^7]: 有关更多详细信息,请参阅 watchman 文档中的 "macOS 文件描述符限制"
¥See "macOS File Descriptor Limits" in the watchman docs for more details