Oracle Cloud 基础设施
Oracle Cloud 基础设施 (OCI) 是一个用于构建和部署业务线应用的云服务平台。
¥Oracle Cloud Infrastructure (OCI) is a cloud services platform for building and deploying line of business applications.
SheetJS 是一个用于从电子表格读取和写入数据的 JavaScript 库。
¥SheetJS is a JavaScript library for reading and writing data from spreadsheets.
此演示探索了 "Visual Builder Studio" (VBS) 环境 [^1]。我们将使用 VBS 和 SheetJS 构建一个处理 Excel 文件的 Web 应用。
¥This demo explores the "Visual Builder Studio" (VBS) environment[^1]. We'll use VBS and SheetJS to build a web application that handles Excel files.
在 "完整示例" 中,我们将创建一个应用,该应用从电子表格导入数据,将数据存储在 "业务对象"[^2] 中,在表格组件中显示数据,并将业务对象导出到新电子表格。
¥In the "Complete Example", we'll create an application that imports data from spreadsheet, stores data in "Business Objects"[^2], displays data in table components, and exports Business Objects to new spreadsheets.
Oracle 云基础设施迭代速度很快,无法保证所引用的服务将来可用。
¥Oracle Cloud Infrastructure iterates quickly and there is no guarantee that the referenced services will be available in the future.
此演示最后一次测试是在 2025-02-04。
¥This demo was last tested on 2025-02-04.
可视化应用
¥Visual Applications
"Visual Builder Studio" 是 Oracle 云基础设施的核心产品,是一个基于浏览器的开发环境,用于创建带有拖放组件的 Web 应用。
¥"Visual Builder Studio", a core Oracle Cloud Infrastructure offering, is a browser-based development environment for creating web applications with drag-and-drop components.
安装
¥Installation
SheetJS 库符合 Visual Builder Studio ECMAScript[^5] 要求。它们可以在应用生命周期的不同点加载到 VBS 应用中。
¥SheetJS libraries conform to Visual Builder Studio ECMAScript[^5] requirements. They can be loaded in VBS applications at different points in the app lifecycle.
RequireJS 模块
¥RequireJS Module
SheetJS 独立脚本 符合 AMD define 语义。它们开箱即用地支持 define。
¥The SheetJS Standalone scripts
comply with AMD define semantics. They support define out of the box.
模块别名
¥Module Alias
与其他平台不同,Oracle Visual Builder define 需要模块别名。别名存储在 app-flow.json 中。SheetJS 脚本旨在使用 xlsx 别名。
¥Unlike other platforms, Oracle Visual Builder define requires module aliases.
Aliases are stored in app-flow.json. SheetJS scripts are designed to use the
xlsx alias.
可以在 Visual Builder Studio 中使用以下步骤添加别名:
¥An alias can be added in Visual Builder Studio with the following steps:
-
从左侧边栏单击 📄
Source。¥Click 📄
Sourcefrom the left sidebar. -
展开
webApps文件夹。¥Expand the
webAppsfolder. -
展开名称与站点的 "应用名称" 匹配的子文件夹。
¥Expand the subfolder whose name matches the "Application Name" for the site.
-
在步骤 3 中的文件夹中打开
app-flow.json。¥Open
app-flow.jsonwithin the folder from step 3. -
在第 5 行后添加以下行:
¥Add the following lines after line 5:
  "requirejs": {
    "paths": {
      "xlsx": "https://cdn.sheetjs.com/xlsx-0.20.3/package/dist/xlsx.full.min"
    }
  },
脚本参考
¥Script Reference
定义别名后,动作链可以使用 define 加载模块:
¥After defining the alias, action chains can load the module using define:
define([
  "xlsx",
  /* ... other libraries ... */
  'vb/action/actionChain', 'vb/action/actions'
], (
  XLSX,
  /* ... variables for the other libraries ... */
  ActionChain, Actions
) => {
  class MyActionChain extends ActionChain {
    async run(context) {
      console.log(XLSX.version); // use XLSX in the callback
    }
    /* ... other methods ... */
  }
  return MyActionChain;
});
HTML
SheetJS 独立脚本 可以在应用的 index.html 入口页面中使用 SCRIPT 标签加载。通常,此文件存储在应用文件夹中。
¥SheetJS Standalone scripts can
be loaded with a SCRIPT tag in the index.html entry page for the app.
Typically this file is stored in the app folder.
例如,如果应用名为 sheetjs_demo_app,则入口点 HTML 文件为 webApps/sheetjs_demo_app/index.html。
¥For example, if the app is named sheetjs_demo_app, the entrypoint HTML file is
webApps/sheetjs_demo_app/index.html.
脚本应添加到 HEAD 块中:
¥The script should be added in the HEAD block:
<script src="https://cdn.sheetjs.com/xlsx-0.20.3/package/dist/xlsx.full.min.js"></script>
这将公开 XLSX 全局对象,其中包括文档 "API 参考" 部分中列出的函数。
¥This will expose the XLSX global object, which includes the functions listed
in the "API Reference" section of the documentation.
Visual Builder 脚本在 <!-- visualBuilderScripts --> 处注入。此注释通常位于 BODY 块中:
¥The Visual Builder scripts are injected at <!-- visualBuilderScripts -->. This
comment is typically in the BODY block:
<body class="oj-web-applayout-body vb-web-applayout-body">

  <oj-vb-content config="[[vbApplication]]"></oj-vb-content>

  <!-- visualBuilderScripts -->
将 SheetJS 独立脚本添加到 HEAD 块可确保在加载 Oracle Visual Builder 脚本之前处理该脚本。
¥Adding the SheetJS Standalone script to the HEAD block ensures the script will
be processed before loading Oracle Visual Builder scripts.
业务对象
¥Business Objects
Oracle VBS 中的 "业务对象"[^2] 为持久数据存储提供了服务器端模型实现。
¥"Business Objects"[^2] in Oracle VBS provides a server-side model implementation for persistent data storage.
可以将它们想象成数据模型和数据库表的组合,可以处理数据存储和 UI 绑定。
¥Think of them as a combination of a data model and database table that handles both data storage and UI binding.
业务对象定义
¥Business Object Definition
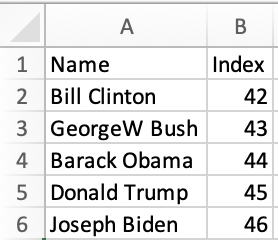
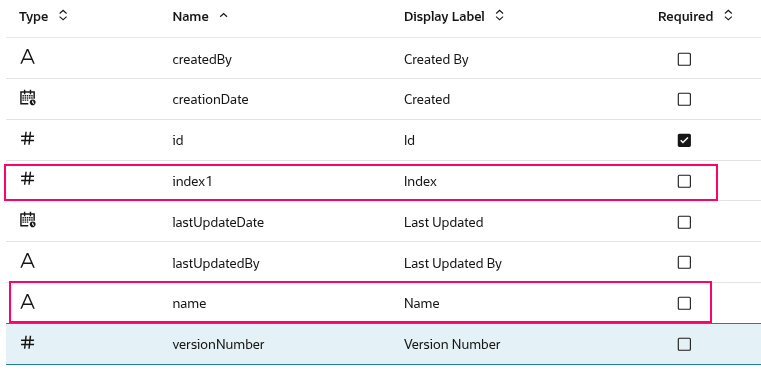
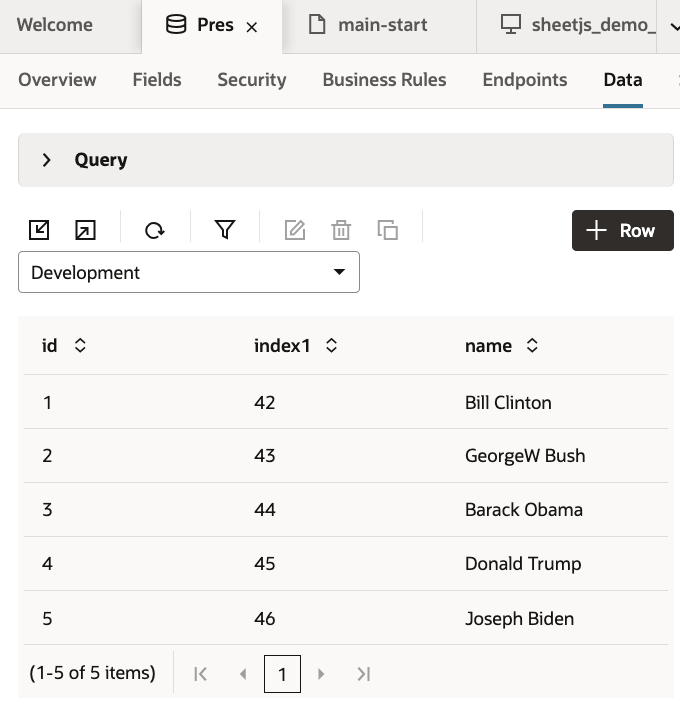
示例 总统表 有一个标题行,其中包含 "名称" 和 "索引" 列。在 Oracle VBS 中,我们将其建模为具有两个字段的业务对象。
¥The example presidents sheet has a header row with "Name" and "Index" columns. In Oracle VBS, we model this as a Business Object with two fields.
Schema
业务对象中的字段必须具有指定的类型。以下模式的示例业务对象定义如下所示:
¥Fields in Business Objects must have a specified type. A sample business object definition for the following schema is shown below:
| 字段 ID | 类型 | 字段标签 |
|---|---|---|
name | string | 名称 |
index1 | number | 索引 |
{ "items" : [ {
    "name": "Pres",
    "fields": {
      "name": { "type": "string", "label": "Name" },
      "index1": { "type": "number", "label": "Index" }
    }
} ] }
数据
¥Data
操作可以使用 REST 调用从业务对象查询数据。响应的 items 属性是一个对象数组。
¥Actions can query data from the Business Object with REST calls. The items
property of the response is an array of objects.
字段由字段 ID 标识。字段名称未出现在结果中。
¥Fields are identified by Field ID. The field names do not appear in the result.
| Spreadsheet | Query Result |
|---|---|
| |
更新业务对象
¥Updating Business Object
从电子表格文件开始,SheetJS read 方法将数据解析为工作簿对象。选择工作表后,sheet_to_json 会生成行对象。使用自动生成的 REST API,可以创建新的业务对象记录。
¥Starting from a spreadsheet file, the SheetJS read
method parses the data into a workbook object. After selecting a worksheet,
sheet_to_json generates row objects.
Using the auto-generated REST API, new Business Object records can be created.
这是下载工作簿、从第一个工作表生成行以及更新业务对象 [^2] 的示例流程图和方法:
¥Here is a sample flow diagram and method for downloading a workbook, generating rows from the first worksheet, and updating a Business Object[^2]:
  define(['vb/action/actionChain', 'vb/action/actions', 'xlsx'], (ActionChain, Actions, XLSX) => {
    class ButtonActionChain extends ActionChain {
      async run(context) {
        /* fetch spreadsheet file */
        const url = "https://xlsx.nodejs.cn/pres.xlsx";
        const data = await (await fetch(url)).arrayBuffer();

        /* parse */
        const wb = XLSX.read(data);
        /* convert the first worksheet to json */
        const ws = wb.Sheets[wb.SheetNames[0]];
        const jsonData = XLSX.utils.sheet_to_json(ws);

        for (const row of jsonData) { // loop over data rows
          /* create object that follows business object definition */
          const presData = {
            name: row.Name,
            index1: Number(row.Index)
          };

          /* update business object with new record */
          await Actions.callRest(context, {
            endpoint: 'businessObjects/create_Pres',
            body: presData
          });
        }
      }
    }
    return ButtonActionChain;
  });
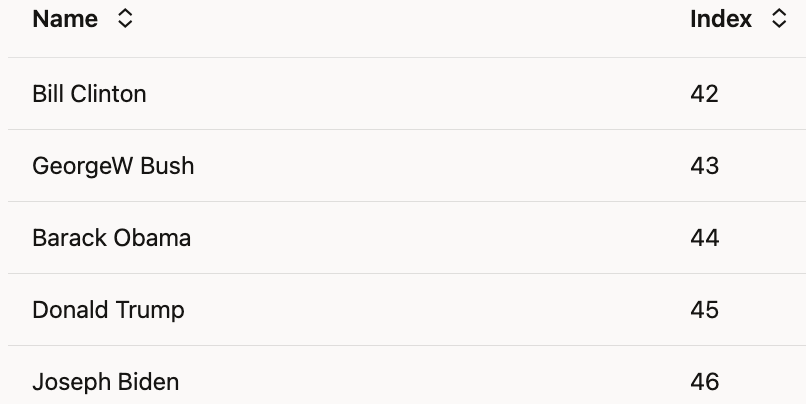
渲染数据
¥Rendering Data
在 Oracle VBS 中,表组件 oj-table[^4] 支持直接绑定到业务对象以显示数据。视图结构指定数据源绑定和列布局。
¥In Oracle VBS, the table component oj-table[^4] supports direct binding to
Business Objects for data display. The view structure specifies the data source
binding and column layout.
使用设计模式添加表时,VBS 将使用基于指定端点结构的列的 ServiceDataProvider。以下视图代码是在测试 "完整示例" 时生成的:
¥When using the design mode to add a Table, VBS will use a ServiceDataProvider
with columns based on the specified Endpoint Structure. The following view code
was generated when testing the "Complete Example":
<div class="oj-flex">
  <!-- Data source for the table -->
  <oj-table scroll-policy="loadMoreOnScroll" class="oj-flex-item oj-sm-12 oj-md-12"
    data="[[$variables.presListSDP]]"
    columns='[
      {"headerText":"Name","field":"name"},
      {"headerText":"Index","field":"index1"}
    ]'>
  </oj-table>
</div>
导出业务对象
¥Exporting Business Objects
导出功能将业务对象数据转换为 Excel 电子表格。�该过程涉及通过 REST API 调用检索数据,将其转换为适合 SheetJS 的格式,并生成 XLSX 文件。以下是完整流程:
¥The export functionality converts Business Object data into an Excel spreadsheet. The process involves retrieving data through REST API call, transforming it into a format suitable for SheetJS, and generating an XLSX file. Here's the complete flow:
define(['vb/action/actionChain', 'vb/action/actions', 'xlsx'], (ActionChain, Actions, XLSX) => {
  class ButtonActionChain1 extends ActionChain {
    async run(context) {
      // get pres data
      const presDataResponse = await Actions.callRest(context, {
        endpoint: 'businessObjects/getall_Pres',
        parameters: {
          fields: 'name,index1'
        }
      });

      // transform to simple array
      const simplifiedData = presDataResponse.body.items.map(item => ({
        Name: item.name,
        Index: item.index1
      }));

      // generate workbook
      const ws = XLSX.utils.json_to_sheet(simplifiedData);
      const wb = XLSX.utils.book_new(ws, "Presidents");

      // export to XLSX which triggers a download
      XLSX.writeFileXLSX(wb, "SheetJSOracleVisualBuilderAoO.xlsx");
    }
  }
  return ButtonActionChain1;
});
导入数据
¥Importing Data
导入功能允许将数据从 Excel 电子表格传输到 Oracle VBS 应用中。该过程首先获取 XLSX 文件,使用 SheetJS 对其进行解析,然后创建相应的业务对象记录。
¥The import functionality enables data transfer from an Excel spreadsheet into the Oracle VBS application. The process begins by fetching the XLSX file, parsing it using SheetJS, and then creating corresponding Business Object records.
define([
  'vb/action/actionChain',
  'vb/action/actions',
  'vb/action/actionUtils',
  'xlsx'
], (
  ActionChain,
  Actions,
  ActionUtils,
  XLSX
) => {
  'use strict';

  class ButtonActionChain extends ActionChain {

    /**

     * @param {Object} context
     */
    async run(context) {
      const { $page, $flow, $application, $constants, $variables } = context;

      // fetch XLSX file
      const url = "https://xlsx.nodejs.cn/pres.xlsx";
      const data = await (await fetch(url)).arrayBuffer();
      const wb = XLSX.read(data);

      // get the first worksheet
      const ws = wb.Sheets[wb.SheetNames[0]];

      // convert to json
      const jsonData = XLSX.utils.sheet_to_json(ws);

      // process each row and create business object records
      for (const row of jsonData) {
        const presData = {
          name: row.Name,
          index1: Number(row.Index)
        };

        // create a business object record
        await Actions.callRest(context, {
          endpoint: 'businessObjects/create_Pres',
          body: presData
        });
      }
    }
  }
  return ButtonActionChain;
});
导出数据
¥Exporting Data
导出功能允许你将业务对象数据转换为 Excel 电子表格。此过程涉及使用 REST API 调用从业务对象检索数据,将其转换为适合 SheetJS 的格式,并生成 XLSX 文件。
¥The export functionality allows you to convert Business Object data into Excel spreadsheets. This process involves retrieving data from the Business Object using REST API calls, transforming it into a format suitable for SheetJS, and generating an XLSX file.
define([
  'vb/action/actionChain',
  'vb/action/actions',
  'vb/action/actionUtils',
  'xlsx'
], (
  ActionChain,
  Actions,
  ActionUtils,
  XLSX
) => {
  'use strict';

  class ButtonActionChain1 extends ActionChain {

    /**

     * @param {Object} context
     */
    async run(context) {
      const { $page, $flow, $application, $constants, $variables } = context;

      // get pres data
      const presDataResponse = await Actions.callRest(context, {
        endpoint: 'businessObjects/getall_Pres',
        parameters: {
          fields: 'name,index1'
        }
      });

      // transform to simple array
      const simplifiedData = presDataResponse.body.items.map(item => ({
        Name: item.name,
        Index: item.index1
      }));

      // generate workbook
      const ws = XLSX.utils.json_to_sheet(simplifiedData);
      const wb = XLSX.utils.book_new(ws, "Presidents");

      /* export to XLSX */
      XLSX.writeFileXLSX(wb, "SheetJSOracleVisualBuilderAoO.xlsx");

    }
  }
  return ButtonActionChain1;
});
完整示例
¥Complete Example
在撰写本文时,Oracle Cloud 提供 30 天免费试用,其中包括 Visual Builder Studio 访问权限。
¥At the time of writing, Oracle Cloud offers a 30-day free trial that includes Visual Builder Studio access.
-
如果你没有,请创建一个新的 Oracle Cloud 免费套餐账户 [^3]。
¥If you do not have one, create a new Oracle Cloud free tier account[^3].
-
登录 Oracle 云管理控制台。
¥Sign in to the Oracle Cloud Management Console.
可视化构建器设置
¥Visual Builder Setup
在本节中,我们将配置 VBS 并创建一个新实例。
¥In this section, we will configure VBS and create a new instance.
-
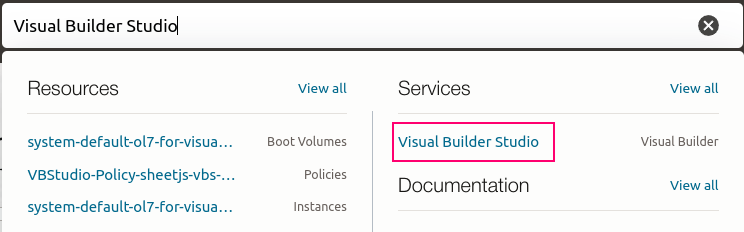
在顶部搜索框中输入 "Visual Builder Studio",然后单击 "服务" 部分中的 "Visual Builder Studio"。
¥Type "Visual Builder Studio" in the top search box and click "Visual Builder Studio" in the "Services" section.
-
单击左侧边栏中的
Visual Builder。在 "列表范围" 部分中,如果未选择任何隔间,请单击下拉列表并选择一个隔间。¥Click
Visual Builderin the left sidebar. In the "List scope" section, if no Compartment is selected, click the dropdown and select a Compartment.
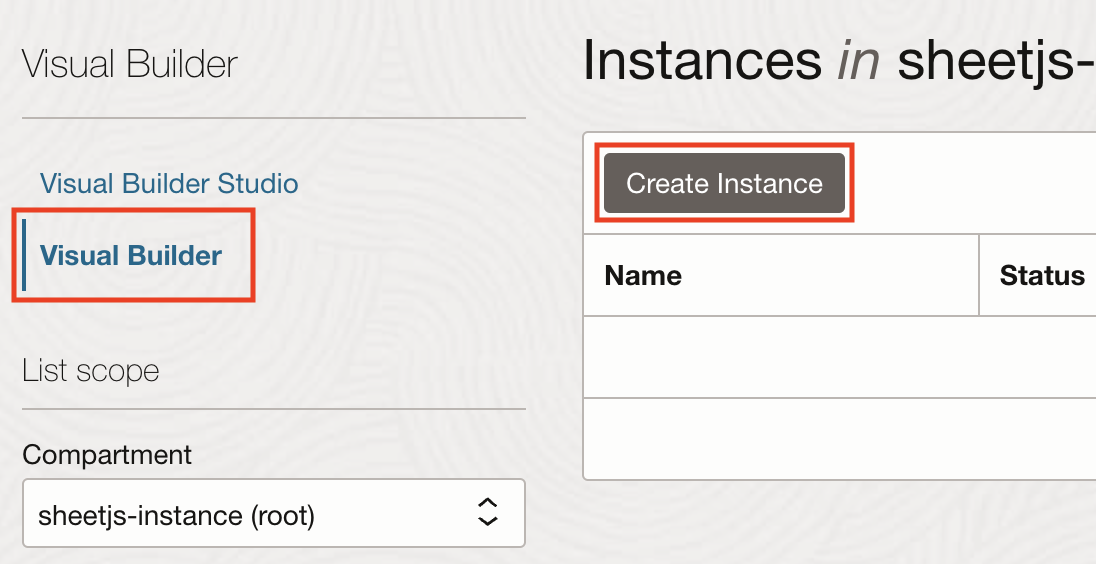
-
单击 "创建实例"。
¥Click "Create Instance".
在“创建实例”面板中,输入以下选项:
¥In the Create Instance panel, enter the following options:
-
名称:
sheetjs-demo-vb-instance¥Name:
sheetjs-demo-vb-instance -
节点:
1(在免费账户中无法更改)¥Nodes:
1(it cannot be changed in a Free account) -
选择网络访问:
Default (No access rules.)¥Choose network access:
Default (No access rules.)
面板应类似于以下屏幕截图:
¥The panel should look like the following screenshot:
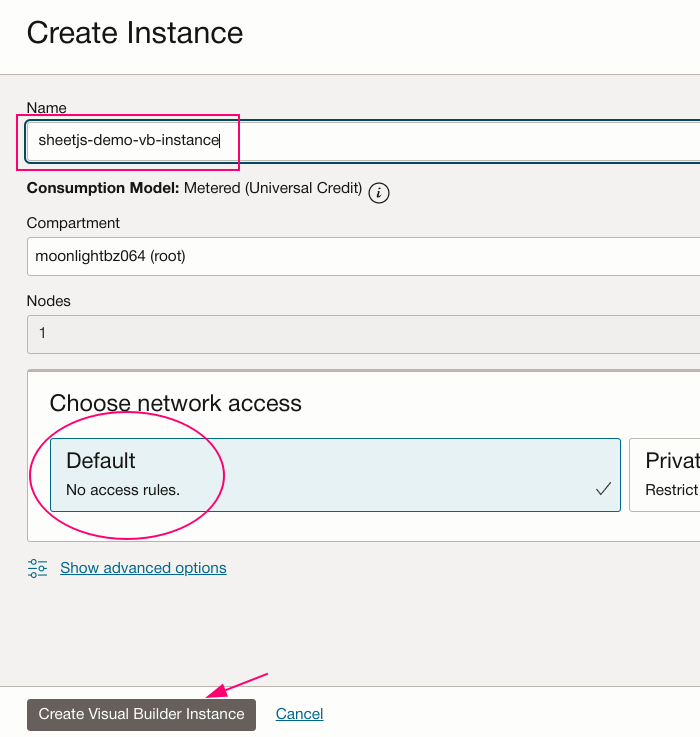
-
单击 "创建 Visual Builder 实例"。面板将关闭。
¥Click "Create Visual Builder Instance". The panel will close.
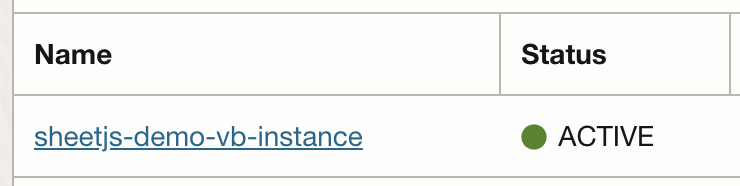
实例表将包含 sheetjs-demo-vb-instance 的新行。实例准备就绪后,状态将更改为 "ACTIVE"。
¥The instances table will include a new row for sheetjs-demo-vb-instance. When
the instance is ready, the status will change to "ACTIVE".
-
单击左侧边栏中的 "Visual Builder Studio"。
¥Click "Visual Builder Studio" in the left sidebar.
-
单击主区域中的 "创建 Visual Builder Studio"。
¥Click "Create Visual Builder Studio" in the main area.
在“创建 Visual Builder Studio 实例”面板中,在“实例名称”文本框中键入 sheetjs-vbs-instance,然后单击 "下一个"
¥In the Create Visual Builder Studio Instance panel, type sheetjs-vbs-instance
in the Instance Name textbox and click "Next"
在 "CI/CD 设置" 页面中,确保选中 "是的,我授权此"。在下拉列表中选择隔间,然后单击 Create Visual Builder Studio。
¥In the "CI/CD Setup" page, ensure "Yes, I authorize this" is checked. Select the
compartment in the dropdown and click Create Visual Builder Studio.
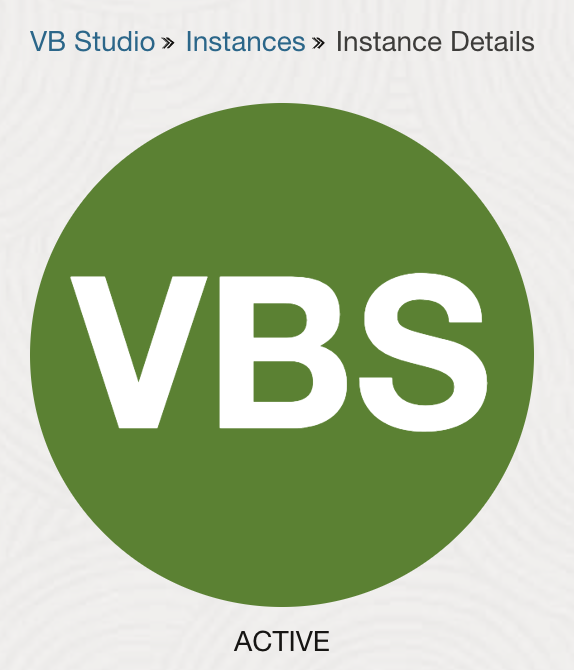
你将被重定向到实例页面。
¥You will be redirected to the instance page.
-
等待实例完成。大圆圈将为绿色。
¥Wait for the instance to be completed. The large circle will be green.
-
单击
Service Console。你将被重定向到组织页面。¥Click
Service Console. You will be redirected to the organization page. -
向下滚动并选择 "项目" 选项卡。单击 "* 创造" 按钮创建一个新项目。"新项目" 向导有 4 个步骤:
¥Scroll down and select the "Projects" tab. Click the "+ Create" button to create a new project. The "New Project" wizard has 4 steps:
-
在 "项目详细信息" 中,输入名称
sheetjs-demo-project并单击 "下一个"¥In "Project Details", enter the Name
sheetjs-demo-projectand click "Next" -
在 "项目模板" 中,选择
Empty Project并单击 "下一个"¥In "Project Template", select
Empty Projectand click "Next" -
在 "项目属性" 页面中,选择
Markdown并单击 "下一个"¥In "Project Properties" page, select
Markdownand click "Next" -
单击 "完成"(默认情况下,当前用户将是 "项目所有者")
¥Click "Finish" (by default, the current user will be the "Project Owner")
在分配资源时,你将被重定向到配置页面:
¥You will be redirected to a provisioning page while resources are allocated:
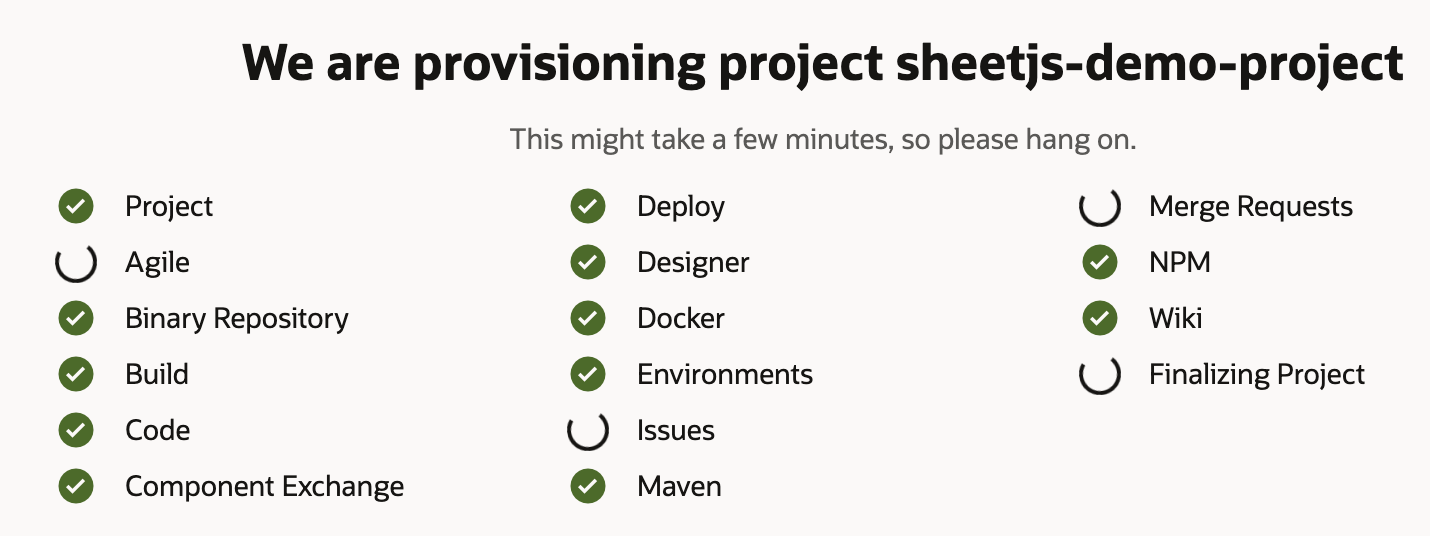
分配后,你将被重定向到项目页面。
¥Once allocated, you will be redirected to the project page.
-
单击左侧边栏中的 "⌂ 项目主页",然后单击 "* 创建环境"。
¥Click "⌂ Project Home" in the left sidebar and click "+ Create Environment".
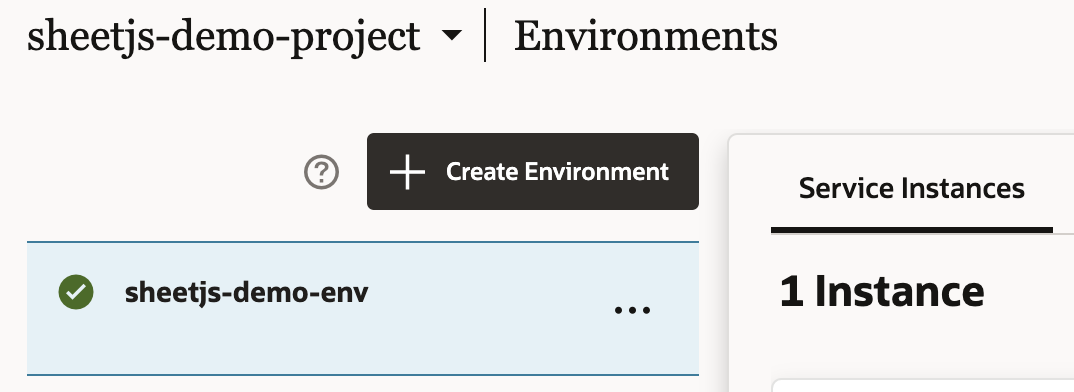
在弹出窗口中,在 "环境名称" 文本框中输入 sheetjs-demo-env,然后单击 "创造"。你将被重定向到环境页面。
¥In the popup, type sheetjs-demo-env in the "Environment Name" text box and
click "Create". You will be redirected to the Environments page.
-
单击
+ Add Instance。在模式中,选择以下内容:¥Click
+ Add Instance. In the modal, select the following:
-
实例类型:"Visual Builder 和 Oracle 集成"
¥Instance Type: "Visual Builder and Oracle Integration"
-
添加实例使用:"实例列表"
¥Add Instance Using: "Instance List"
-
选中
sheetjs-demo-vb-instance表行中的复选框。¥Check the box in the
sheetjs-demo-vb-instancetable row.
选择应与以下屏幕截图相匹配:
¥The selections should match the following screenshot:

进行选择后,单击 "添加"。创建实例后,主区域中的 sheetjs-demo-env 旁边会有一个复选标记。
¥After making the selections, click "Add". Once the instance is created, there
will be a checkmark next to sheetjs-demo-env in the main area.
-
选择 "服务实例" 选项卡,找到
sheetjs-demo-vb-instance卡。如果未显示 "实例 URL",请单击 "细节" 以显示 URL�。¥Select the "Service Instances" tab and find the
sheetjs-demo-vb-instancecard. If "Instance URL" is not shown, click "Details" to show the URL.
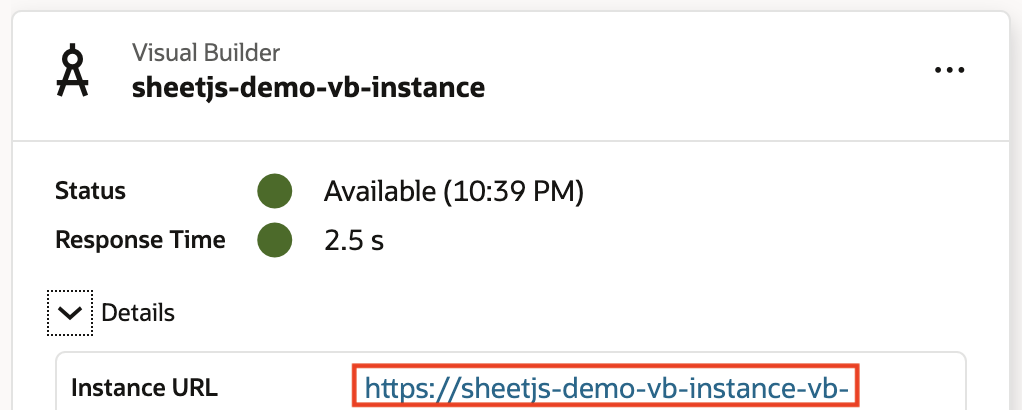
单击 "实例 URL"。Visual Builder 将在新窗口中打开。
¥Click the "Instance URL". Visual Builder will be launched in a new window.
-
单击 "* 新应用"。在弹出窗口中,输入以下选项:
¥Click "+ New Application". In the popup, enter the following options:
-
应用显示名称:
sheetjs-vbs-demo¥Application Display Name:
sheetjs-vbs-demo -
应用名称:
sheetjs_vbs_demo(自动)¥Application Name:
sheetjs_vbs_demo(automatic) -
应用模板:
Empty Application(默认)¥Application Template:
Empty Application(default)
单击 "完成"。短暂等待后,浏览器将重定向到新应用。
¥Click "Finish". After a short wait, the browser will redirect to the new app.
业务对象设置
¥Business Object Setup
在本节中,我们将创建一个新的业务对象。
¥In this section, we will create a new Business Object.
-
单击“欢迎”选项卡中的业务对象卡或左侧边栏中的 "⛁" 图标。将显示 "业务对象" 面板。
¥Click the Business Objects card in the Welcome tab or the "⛁" icon in the left sidebar. The "Business Objects" panel will be displayed.
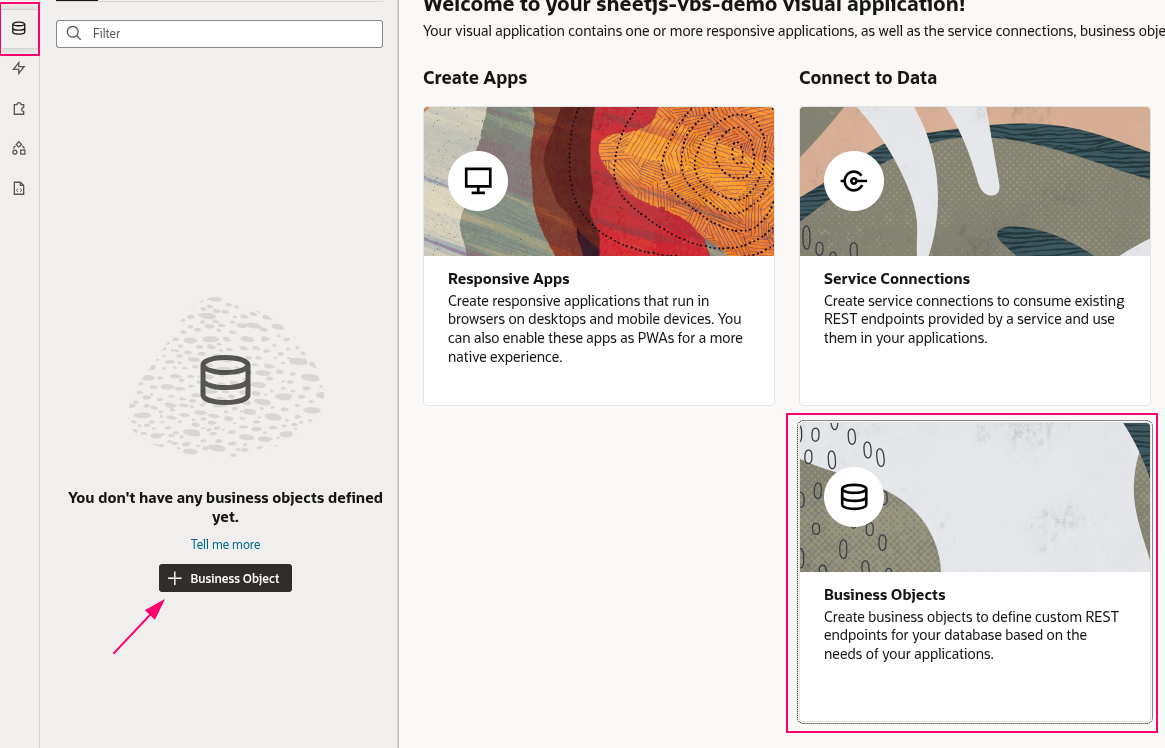
单击 "* 业务对象"。在弹出窗口中,输入以下内容:
¥Click "+ Business Object". In the popup, enter the following:
-
名称:
Pres¥Name:
Pres -
显示标签:
President¥Display Label:
President
单击 "创造"。你将被重定向到业务对象页面。
¥Click "Create". You will be redirected to the Business Object page.
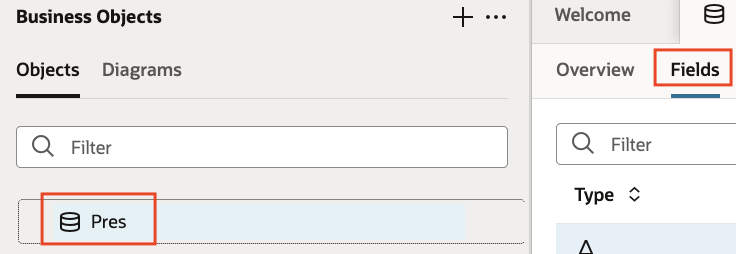
-
在 Business Objects 面板中选择
Pres,然后选择 "字段" 选项卡。¥Select
Presin the Business Objects panel and select the "Fields" tab.
-
单击 "* 字段" 并在下拉列表中选择 "字段"。在显示的表单中,输入以下选项:
¥Click "+ Field" and select "Field" in the dropdown. In the displayed form, enter the following options:
-
标签:
Name¥Label:
Name -
类型:单击
A(String将显示在类型旁边)¥Type: Click
A(Stringwill be displayed next to Type)
单击 "创建字段"。
¥Click "Create Field".
-
单击 "* 字段" 并在下拉列表中选择 "字段"。在显示的表单中,��输入以下选项:(我们正在创建第二个字段)
¥Click "+ Field" and select "Field" in the dropdown. In the displayed form, enter the following options: (we are creating a second field)
-
标签:
Index¥Label:
Index -
类型:单击
#(Number将显示在类型旁边)¥Type: Click
#(Numberwill be displayed next to Type)
单击 "创建字段"。
¥Click "Create Field".
-
扫描主表并验证是否添加了两行新行:
¥Scan the main table and verify that two new rows were added:
Web 应用创建
¥Web App Creation
在本节中,我们将创建一个新的 Web 应用。
¥In this section, we will create a new web application.
-
单击左侧栏中的 "🖥️ Web 应用",然后单击 "* Web 应用"。在弹出窗口中,输入以下选项:
¥Click "🖥️ Web Applications" in the left bar and click "+ Web Application". In the popup, enter the following options:
-
应用名称:
sheetjs_demo_app¥Application Name:
sheetjs_demo_app -
导航样式:
None¥Navigation Style:
None
单击 "创造"。你将被重定向到页面��设计器。
¥Click "Create". You will be redirected to the page designer.
如果提示共享剪贴板,请选择 "允许"。
¥If prompted to share clipboard, select "Allow".
SheetJS 别名
¥SheetJS Alias
在本节中,我们将为 SheetJS CDN 上托管的 SheetJS 独立脚本创建一个别名
¥In this section, we will create an alias to the SheetJS standalone script hosted on the SheetJS CDN
-
从左侧边栏单击 📄
Source。¥Click 📄
Sourcefrom the left sidebar. -
在文件树中,如果
app-flow.json不可见,请单击sheetjs_demo_app旁边的三角形以展开文件夹。¥In the file tree, if
app-flow.jsonis not visible, click the triangle next tosheetjs_demo_appto expand the folder.
单击 sheetjs_demo_app 名称没有任何效果!你必须单击标签旁边的三角形才能展开文件夹。
¥Clicking on the sheetjs_demo_app name has no effect! You must click the
triangle next to the label to expand the folder.
-
在
sheetjs_demo_app文件夹中选择app-flow.json。¥Select
app-flow.jsonwithin thesheetjs_demo_appfolder.
主区域将显示一个新的代码窗口。
¥A new code window will be displayed in the main area.
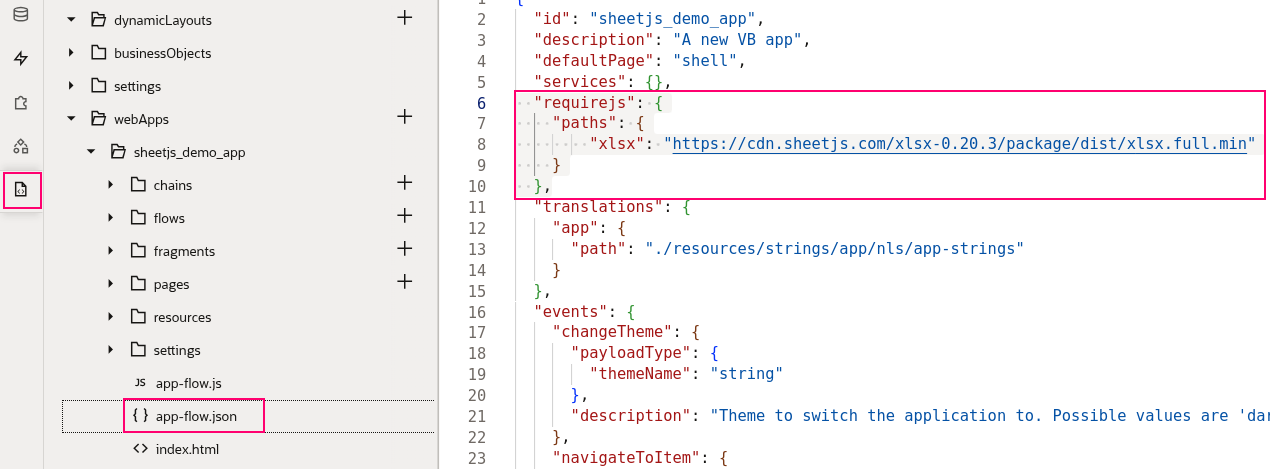
-
复制以下代码块并将其插入代码编辑器中的第 5 行之后:
¥Copy the following codeblock and insert it after line 5 in the code editor:
  "requirejs": {
      "paths": {
        "xlsx": "https://cdn.sheetjs.com/xlsx-0.20.3/package/dist/xlsx.full.min"
      }
  },
以下屏幕截图显示插入代码后的结果:
¥The following screenshot shows the result after inserting the code:
应用界面
¥App Interface
在本节中,我们将为应用创建 UI。它将包括两个用于导入/导出的按钮和一个用于显示数据的表格。
¥In this section, we will create the UI for the application. It will include two buttons for import/export and a table for displaying data.
-
单击左侧边栏中的 "🖥️ Web 应用"。
¥Click "🖥️ Web Applications" in the left sidebar.
-
在树中,如果
main-start不可见,请单击main旁边的三角形以展开文件夹。¥In the tree, if
main-startis not visible, click the triangle next tomainto expand the folder.
单击 main 名称不会展开树!你必须单击标签旁边的三角形才能展开子树。
¥Clicking on the main name does not expand the tree! You must click the
triangle next to the label to expand the subtree.
-
在
main部分中选择main-start。¥Select
main-startwithin themainsection. -
选择 "页面设计器" 选项卡,然后选择 "设计" 选项卡。
¥Select the "Page Designer" tab and select the "Design" tab.
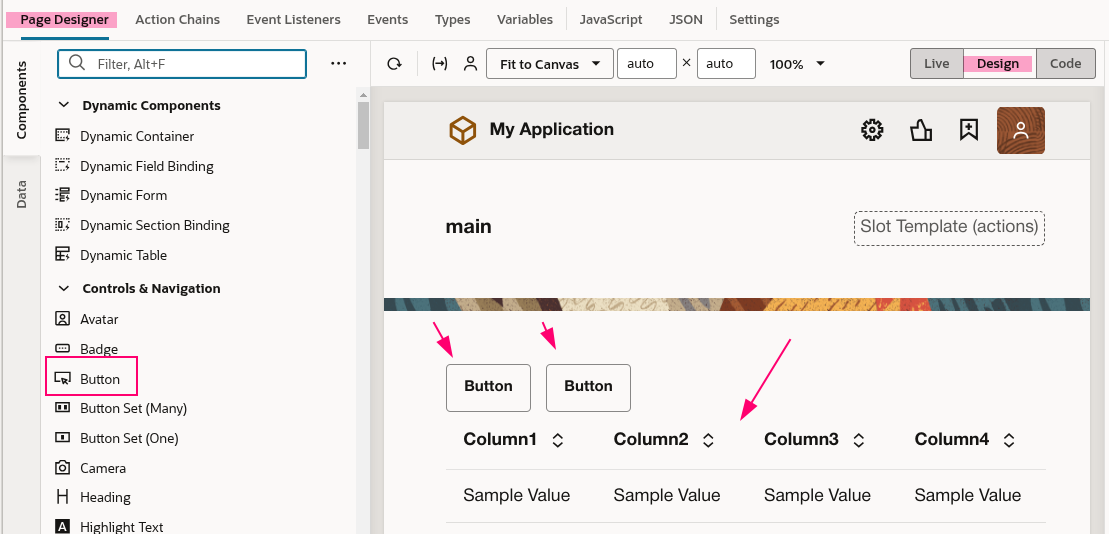
在页面设计器中,将两个 Button 组件和一个 Table 组件拖放到画布上。
¥In the page designer, drag and drop two Button components and one Table
Component to the canvas.
"表" 组件位于 "集合" 部分。不要添加 "动态表"!
¥The "Table" component is in the "Collections" section. Do not add a "Dynamic Table"!
操作设置
¥Actions Setup
在本节中,我们将为导入和导出按钮添加事件处理程序。
¥In this section, we will add event handlers for the import and export buttons.
-
选择画布中的第一个按钮。
¥Select the first button in the canvas.
-
在右侧面板中,选择 "一般的" 选项卡。输入以下详细信息:
¥In the right panel, select the "General" tab. Enter the following details:
-
ID:
import-xlsx -
标签:
Import XLSX¥Label:
Import XLSX
输入标签后按 Enter。画布将刷新。
¥Press Enter after typing the label. The canvas will refresh.
-
选择 "事件" 选项卡,然后单击 "* 事件监听器"。在下拉菜单中,单击
🔔 On 'ojAction'。¥Select the "Events" tab and click "+ Event Listener". In the dropdown, click
🔔 On 'ojAction'. -
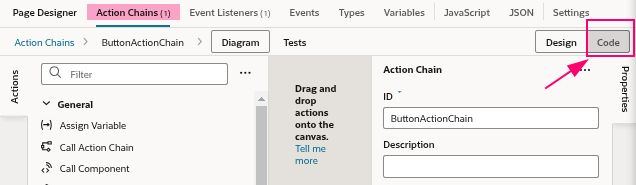
单击顶部栏中的 "动作链"("页面设计器" 旁边)。
¥Click "Action Chains" in the top bar (next to "Page Designer").
-
在右上角的选项卡中选择 "代码"。
¥Select "Code" in the top-right tab.
主区域将显示代码编辑器。
¥The main area will show a code editor.
-
复制 "导入数据代码" 示例代码并粘贴到代码编辑器中。
¥Copy the "Importing Data code" example code and paste in the code editor.
-
单击 "页面设计器" 返回页面设计器。
¥Click "Page Designer" to return to the page designer.
-
选择画布中的第二个按钮(不是 "导入 XLSX" 按钮!)
¥Select the second button in the canvas (not the "Import XLSX" button!)
-
在右侧面板中,选择 "一般的" 选项卡。输入以下详细信息:
¥In the right panel, select the "General" tab. Enter the following details:
-
ID:
export-xlsx -
标签:
Import XLSX¥Label:
Import XLSX
输入标签后按 Enter。画布将刷新。
¥Press Enter after typing the label. The canvas will refresh.
-
选择 "事件" 选项卡,然后单击 "* 事件监听器"。在下拉菜单中,单击
🔔 On 'ojAction'。¥Select the "Events" tab and click "+ Event Listener". In the dropdown, click
🔔 On 'ojAction'. -
单击顶部栏中的 "动作链"("页面设计器" 旁边)。
¥Click "Action Chains" in the top bar (next to "Page Designer").
-
在右上角的选项卡中选择 "代码"。
¥Select "Code" in the top-right tab.
-
复制 "导出数据代码" 示例代码并粘贴到代码编辑器中。
¥Copy the "Exporting Data code" example code and paste in the code editor.
数据��绑定
¥Data Binding
在本节中,我们将把 Pres 业务对象连接到表。
¥In this section, we will connect the Pres Business object to the Table.
-
单击 "页面设计器" 返回页面设计器。
¥Click "Page Designer" to return to the page designer.
-
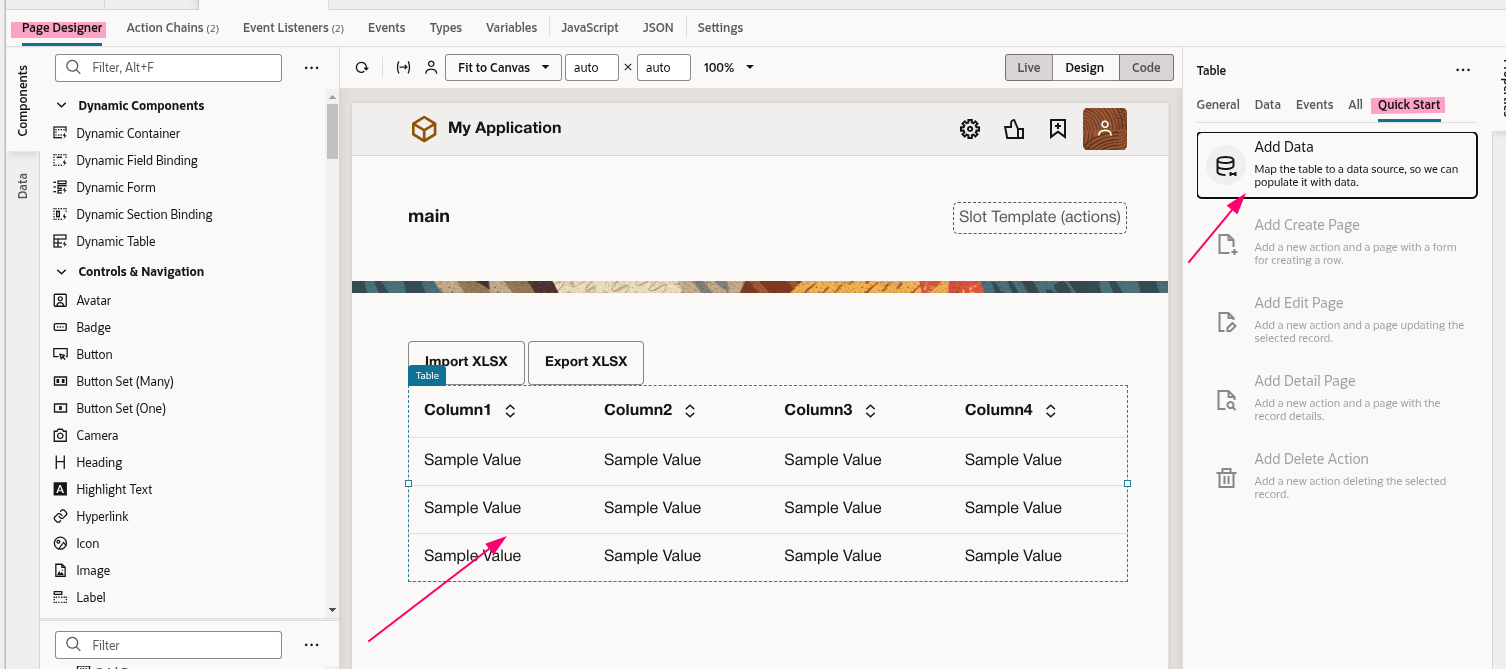
在画布中选择 Table 组件。
¥Select the Table component in the canvas.
-
在右侧面板中,选择 "快速开始" 选项卡,然后单击 "添加数据"。
¥In the right panel, select the "Quick Start" tab and click "Add Data".
-
完成 "添加数据" 向导:
¥Complete the "Add Data" wizard:
-
在 "选择数据来源" 中,在 "业务对象" 部分中选择 "Pres" 并单击 "下一个"。
¥In "Choose the source of your data", select "Pres" in the "Business Objects" section and click "Next".
-
在下一节 ("绑定数据") 中,选中
name旁边的框和index1旁边的框。确认页面如以下屏幕截图所示后,单击 "下一个"。¥In the next section ("Bind Data"), check the box next to
nameand the box next toindex1. After confirming the page looks like the following screenshot, click "Next".

-
在下一节 ("定义查询") 中单击 "完成"。
¥In the next section ("Define Query") click "Finish".
应用测试
¥App Testing
在本节中,我们将测试导入和导出功能。
¥In this section, we will test import and export functionality.
-
单击页面右上角的预览按钮(▶️ 图标)。
¥Click the Preview button (▶️ icon) in the top-right corner of the page.
应用将在新浏览器选项卡中启动。
¥The application will be launched in a new browser tab.
-
单击 "导入 XLSX"。
¥Click "Import XLSX".
-
切换回 Visual Builder 窗口。
¥Switch back to the Visual Builder window.
-
单击左侧边栏中的 "⛁" 图标,然后单击 "Pres" 业务对象。
¥Click the "⛁" icon in the left sidebar and click the "Pres" Business Object.
-
切换到“"数据"”选项卡并验证是否已添加新数据。
¥Switch to the "Data" tab and verify that new data has been added.
在某些测试运行中,未添加任何数据。
¥In some test runs, no data was added.
重复 "SheetJS 别名" 步骤并确认别名存在。
¥Repeat the "SheetJS Alias" steps and confirm the alias exists.
如果缺少别名,请添加别名并启动新的预览窗口。
¥If the alias is missing, add the alias and launch a new Preview window.
-
切换回 "预览" 窗口并刷新页面。
¥Switch back to the "Preview" window and refresh the page.
预览现在将显示来自 "Pres" 业务对象的数据。
¥The preview will now show the data from the "Pres" Business Object.
-
单击 "导出 XLSX" 按钮。
¥Click the "Export XLSX" button.
应用将尝试下载 SheetJSOracleVisualBuilderAoO.xlsx
¥The app will attempt to download SheetJSOracleVisualBuilderAoO.xlsx
保存文件并使用电子表格编辑器打开。确认电子表格与应用中显示的数据相匹配。
¥Save the file and open with a spreadsheet editor. Confirm the spreadsheet matches the data shown in the app.
[^1]: 请参阅 Oracle Cloud 文档中的 "Oracle Visual Builder Studio"。
¥See "Oracle Visual Builder Studio" in the Oracle Cloud documentation.
[^2]: 请参阅 Oracle Visual Build Studio 文档中的 "使用业务对象"。
¥See "Work With Business Objects" in the Oracle Visual Build Studio documentation.
[^3]: 注册免费账户 在 Oracle Cloud Free Tier 上 需要有效的调用号码和有效的信用卡。
¥Registering for a free account on the Oracle Cloud Free Tier requires a valid phone number and a valid credit card.
[^4]: 详细信息请参见 Oracle VBS 表组件。
¥See Oracle VBS Table Component for more details.
[^5]: 有关自定义 JavaScript 功能和模块处理的更多详细信息,请参阅 "Oracle VBS 中的 JavaScript 支持"。
¥See "JavaScript Support in Oracle VBS" for more details on custom JavaScript functionality and module handling.