GatsbyJS 站点中的电子表格
GatsbyJS 是一个用于创建网站的框架。它使用 React 组件作为页面模板,使用 GraphQL 来加载数据。
¥GatsbyJS is a framework for creating websites. It uses React components for page templates and GraphQL for loading data.
SheetJS 是一个用于从电子表格读取和写入数据的 JavaScript 库。
¥SheetJS is a JavaScript library for reading and writing data from spreadsheets.
该演示使用 GatsbyJS 和 SheetJS(通过 gatsby-transformer-excel[^1] 转换器)从电子表格中提取数据并在页面中显示内容。
¥This demo uses GatsbyJS and SheetJS (through the gatsby-transformer-excel[^1]
transformer) to pull data from a spreadsheet and display the content in a page.
"完整示例" 部分包括一个由 XLSX 电子表格提供支持的完整网站。
¥The "Complete Example" section includes a complete website powered by an XLSX spreadsheet.
gatsby-transformer-excel 由 Gatsby 核心团队维护,所有错误都应针对 Gatsby 主项目。如果确定是解析逻辑中的错误,则应向 SheetJS 团队提出问题。
¥gatsby-transformer-excel is maintained by the Gatsby core team and all bugs
should be directed to the main Gatsby project. If it is determined to be a bug
in the parsing logic, issues should then be raised with the SheetJS team.
gatsby-transformer-excel 使用旧版本的库。它可以通过最新版本的 NodeJS 中的 package.json 覆盖来覆盖:
¥gatsby-transformer-excel uses an older version of the library. It can be
overridden through a package.json override in the latest versions of NodeJS:
{
  "overrides": {
    "xlsx": "https://cdn.sheetjs.com/xlsx-0.20.3/xlsx-0.20.3.tgz"
  }
}
旧版本的 GatsbyJS 默认收集遥测数据。telemetry 子命令可以禁用遥测:
¥Older versions of GatsbyJS collect telemetry by default. The telemetry
subcommand can disable telemetry:
npx gatsby telemetry --disable
GatsbyJS 5.14.1 不传输遥测:
¥GatsbyJS 5.14.1 does not transmit telemetry:
Telemetry is no longer gathered and is always disabled
仍然强烈建议禁用遥测,因为较旧的项目可能会使用嵌入遥测的 GatsbyJS 版本。
¥It is still strongly encouraged to disable telemetry since older projects may use a GatsbyJS version that embeds telemetry.
集成详情
¥Integration Details
在 GatsbyJS 数据系统中,源插件从数据源读取并生成代表原始数据的节点。转换器插件将这些节点转换为代表已处理数据以在页面中使用的其他节点。
¥In the GatsbyJS data system, source plugins read from data sources and generate nodes represent raw data. Transformer plugins transform these nodes into other nodes that represent processed data for use in pages.
此示例使用 gatsby-source-filesystem[^2] 从文件系统读取文件,并使用 gatsby-transformer-excel 转换器来执行转换。
¥This example uses gatsby-source-filesystem[^2] to read files from the
filesystem and gatsby-transformer-excel transformer to perform the transform.
安装
¥Installation
SheetJS NodeJS 模块 将被 gatsby-transformer-excel 引用。
¥The SheetJS NodeJS module will be
referenced by gatsby-transformer-excel.
安装之前,为确保转换器使用最新版本的库,必须将 overrides 部分添加到 package.json:
¥Before installing, to ensure that the transformer uses the latest version of the
library, the overrides section must be added to package.json:
{
  "overrides": {
    "xlsx": "https://cdn.sheetjs.com/xlsx-0.20.3/xlsx-0.20.3.tgz"
  }
}
安装 SheetJS 模块后应安装 gatsby-transformer-excel 和 gatsby-source-filesystem:
¥gatsby-transformer-excel and gatsby-source-filesystem should be installed
after installing SheetJS modules:
- npm
- pnpm
- Yarn
npx gatsby telemetry --disable
npm i --save https://cdn.sheetjs.com/xlsx-0.20.3/xlsx-0.20.3.tgz
npm i --save gatsby-transformer-excel gatsby-source-filesystem
npx gatsby telemetry --disable
pnpm install --save https://cdn.sheetjs.com/xlsx-0.20.3/xlsx-0.20.3.tgz
pnpm install --save gatsby-transformer-excel gatsby-source-filesystem
npx gatsby telemetry --disable
yarn add https://cdn.sheetjs.com/xlsx-0.20.3/xlsx-0.20.3.tgz
yarn add gatsby-transformer-excel gatsby-source-filesystem
GraphQL 详细信息
¥GraphQL details
在底层,gatsby-transformer-excel 使用 SheetJS read[^3] 方法将工作簿解析为 SheetJS 工作簿 [^4]。每个工作表都是从工作簿中提取的。sheet_to_json 方法 [^5] 使用第一行中的标题作为键生成行对象。
¥Under the hood, gatsby-transformer-excel uses the SheetJS read[^3] method to
parse the workbook into a SheetJS workbook[^4]. Each worksheet is extracted from
the workbook. The sheet_to_json method[^5] generates row objects using the
headers in the first row as keys.
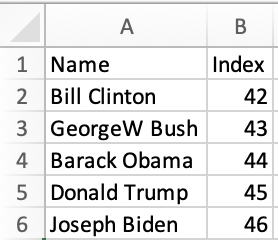
考虑以下工作表:
¥Consider the following worksheet:

假设文件名为 pres.xlsx,数据存储在 "Sheet1" 中,则将创建以下节点:
¥Assuming the file name is pres.xlsx and the data is stored in "Sheet1", the
following nodes will be created:
[
  { Name: "Bill Clinton", Index: 42, type: "PresXlsxSheet1" },
  { Name: "GeorgeW Bush", Index: 43, type: "PresXlsxSheet1" },
  { Name: "Barack Obama", Index: 44, type: "PresXlsxSheet1" },
  { Name: "Donald Trump", Index: 45, type: "PresXlsxSheet1" },
  { Name: "Joseph Biden", Index: 46, type: "PresXlsxSheet1" },
]
该类型是文件名与工作表名称连接的正确大小写。
¥The type is a proper casing of the file name concatenated with the sheet name.
以下查询从每行中提取 Name 和 Index 字段:
¥The following query pulls the Name and Index fields from each row:
{
  allPresXlsxSheet1 { # "all" followed by type
    edges {
      node { # each line in this block should be a field in the data
        Name
        Index
      }
    }
  }
}
完整示例
¥Complete Example
本 demo 在以下环境下进行了测试:
¥This demo was tested in the following environments:
| GatsbyJS | 日期 |
|---|---|
5.14.1 | 2025-01-19 |
4.25.8 | 2025-01-02 |
项目设置
¥Project setup
-
禁用 GatsbyJS 遥测:
¥Disable GatsbyJS telemetry:
npx gatsby telemetry --disable
在 NodeJS 22 中,该过程显示错误:
¥In NodeJS 22, the process displayed an error:
ERROR UNKNOWN(node:25039) [DEP0040] DeprecationWarning: The
punycodemodule is deprecated. Please use a userland alternative instead. (Usenode --trace-deprecation ...to show where the warning was created)
这是虚假报道!
¥This is a false report!
可以安全地忽略该错误。
¥The error can be safely ignored.
-
创建模板站点:
¥Create a template site:
npx gatsby new sheetjs-gatsby
对于较旧的 Gatsby 版本,项目必须从起始项目构建。
¥For older Gatsby versions, the project must be built from the starter project.
GatsbyJS 4 的入门提交是 6bc4466090845f20650117b3d27e68e6e46dc8d5。可以使用 git 获取此版本的启动器:
¥The starter commit for GatsbyJS 4 is 6bc4466090845f20650117b3d27e68e6e46dc8d5.
This version of the starter can be fetched with git:
git clone https://github.com/gatsbyjs/gatsby-starter-default sheetjs-gatsby
cd sheetjs-gatsby
git checkout 6bc4466090845f20650117b3d27e68e6e46dc8d5
npm install
cd ..
-
启动本地开发服务器:
¥Start the local development server:
cd sheetjs-gatsby
npm run develop
打开 Web 浏览器并访问显示的 URL(通常为 http://localhost:8000/)
¥Open a web browser to the displayed URL (typically http://localhost:8000/)
-
编辑
package.json并在 JSON 对象中添加高亮的行:¥Edit
package.jsonand add the highlighted lines in the JSON object:
{
  "overrides": {
    "xlsx": "https://cdn.sheetjs.com/xlsx-0.20.3/xlsx-0.20.3.tgz"
  },
  "name": "sheetjs-gatsby",
  "version": "1.0.0",
-
安装 SheetJS 库和 GatsbyJS 插件:
¥Install the SheetJS library and GatsbyJS plugins:
npm i --save https://cdn.sheetjs.com/xlsx-0.20.3/xlsx-0.20.3.tgz
npm i --save gatsby-transformer-excel gatsby-source-filesystem
对于旧版本的 Gatsby,必须使用旧版本的依赖。
¥For older versions of Gatsby, older versions of the dependencies must be used.
对于 GatsbyJS 4,插件版本号与 Gatsby 版本一致:
¥For GatsbyJS 4, the plugin version numbers align with the Gatsby version:
npm i --save gatsby-transformer-excel@4 gatsby-source-filesystem@4
-
创建
src/data目录,下载 https://xlsx.nodejs.cn/pres.xlsx,并将下载的文件移动到新文件夹中:¥Make a
src/datadirectory, download https://xlsx.nodejs.cn/pres.xlsx, and move the downloaded file into the new folder:
mkdir -p src/data
curl -L -o src/data/pres.xlsx https://xlsx.nodejs.cn/pres.xlsx
-
编辑
gatsby-config.js并将以下行添加到plugins数组中:¥Edit
gatsby-config.jsand add the following lines to thepluginsarray:
module.exports = {
  siteMetadata: {
    title: `sheetjs-gatsby`,
    siteUrl: `https://www.yourdomain.tld`,
  },
  plugins: [
    {
      resolve: `gatsby-source-filesystem`,
      options: {
        name: `data`,
        path: `${__dirname}/src/data/`,
      },
    },
    `gatsby-transformer-excel`,
  ],
}
如果 plugins 数组存在,则应在开头添加两个插件:
¥If the plugins array exists, the two plugins should be added at the beginning:
  plugins: [
    {
      resolve: `gatsby-source-filesystem`,
      options: {
        name: `data`,
        path: `${__dirname}/src/data/`,
      },
    },
    `gatsby-transformer-excel`,
    // ...
-
停止并重新启动开发服务器进程:
¥Stop and restart the development server process:
npm run develop
GraphiQL 测试
¥GraphiQL test
-
在 Web 浏览器中打开 GraphiQL 编辑器。上一步的输出显示了 URL(通常为
http://localhost:8000/___graphql)。¥Open the GraphiQL editor in a web browser. The output of the previous step displayed the URL (typically
http://localhost:8000/___graphql). -
将以下查询粘贴到代码编辑器中:
¥Paste the following query into the code editor:
{
  allPresXlsxSheet1 {
    edges {
      node {
        Name
        Index
      }
    }
  }
}
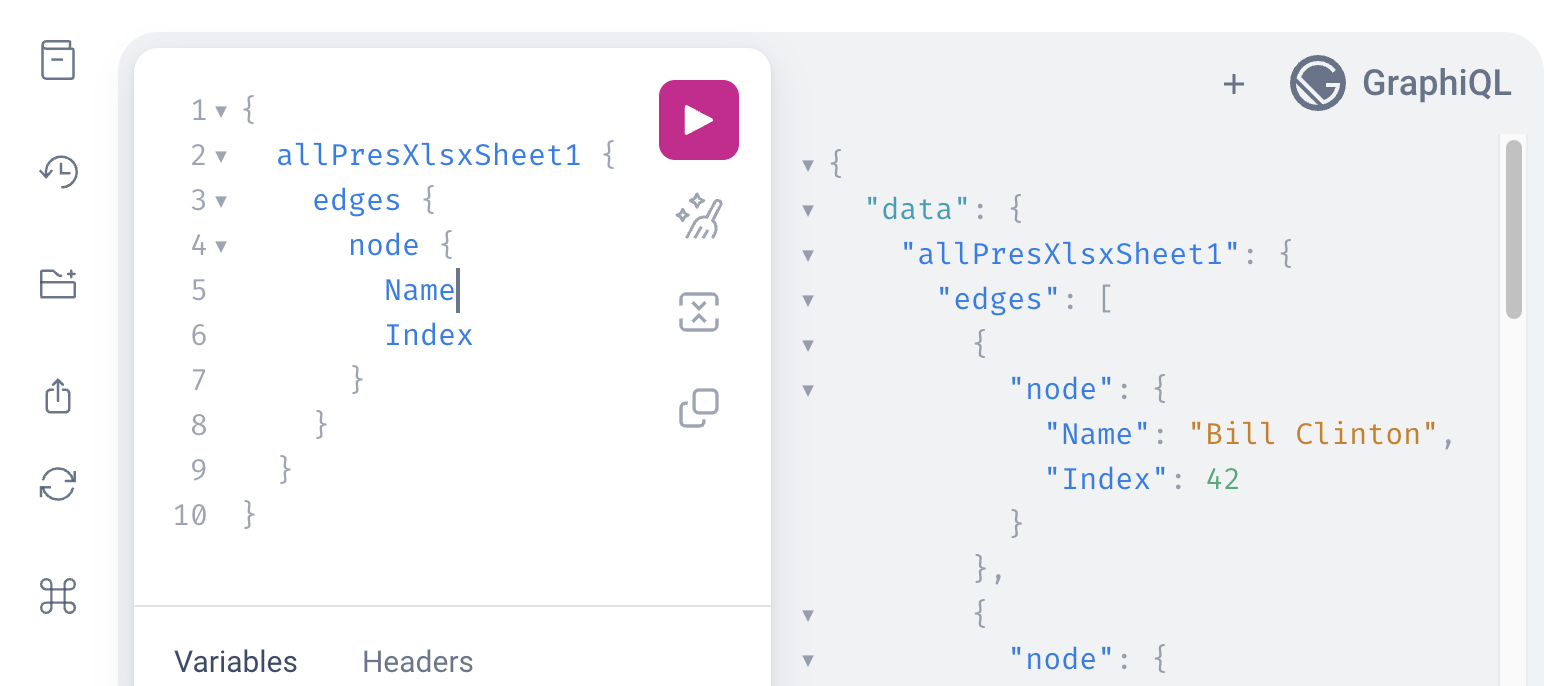
按“执行查询”按钮 (▶),数据应显示在右侧窗格中:
¥Press the Execute Query button (▶) and data should show up in the right pane:

Sample Output (click to show)
In GatsbyJS versions 5.13.4 and 4.25.8, the raw output was:
{
  "data": {
    "allPresXlsxSheet1": {
      "edges": [
        {
          "node": {
            "Name": "Bill Clinton",
            "Index": 42
          }
        },
        {
          "node": {
            "Name": "GeorgeW Bush",
            "Index": 43
          }
        },
        {
          "node": {
            "Name": "Barack Obama",
            "Index": 44
          }
        },
        {
          "node": {
            "Name": "Donald Trump",
            "Index": 45
          }
        },
        {
          "node": {
            "Name": "Joseph Biden",
            "Index": 46
          }
        }
      ]
    }
  },
  "extensions": {}
}
React 页面
¥React page
-
创建一个显示原始查询结果的新页面
src/pages/pres.js:¥Create a new page
src/pages/pres.jsthat displays the raw query result:
import { graphql } from "gatsby"
import * as React from "react"

export const query = graphql`query {
  allPresXlsxSheet1 {
    edges {
      node {
        Name
        Index
      }
    }
  }
}`;

const PageComponent = ({data}) => {
  return ( <pre>{JSON.stringify(data, 2, 2)}</pre> );
};
export default PageComponent;
保存文件。
¥Save the file.
-
在 Web 浏览器中访问
/pres页面(通常为http://localhost:8000/pres)。显示的 JSON 是组件接收到的数据:¥Access the
/prespage (typicallyhttp://localhost:8000/pres) in a web browser. The displayed JSON is the data that the component receives:
{
  "allPresXlsxSheet1": {
    "edges": [
      {
        "node": {
          "Name": "Bill Clinton",
          "Index": 42
        }
      },
  // ....
-
更改
PageComponent以根据数据显示表格:¥Change
PageComponentto display a table based on the data:
import { graphql } from "gatsby"
import * as React from "react"

export const query = graphql`query {
  allPresXlsxSheet1 {
    edges {
      node {
        Name
        Index
      }
    }
  }
}`;

const PageComponent = ({data}) => {
  const rows = data.allPresXlsxSheet1.edges.map(r => r.node);
  return ( <table>
    <thead><tr><th>Name</th><th>Index</th></tr></thead>
    <tbody>{rows.map(row => ( <tr>
      <td>{row.Name}</td>
      <td>{row.Index}</td>
    </tr> ))}</tbody>
  </table> );
};

export default PageComponent;
返回浏览器,http://localhost:8000/pres 会显示一个表格:
¥Going back to the browser, http://localhost:8000/pres will show a table:

实时刷新
¥Live refresh
-
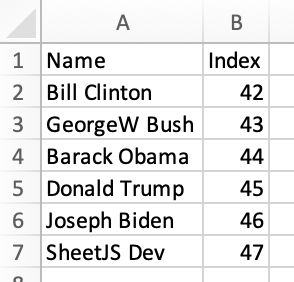
在 Excel 或其他电子表格编辑器中打开文件
src/data/pres.xlsx。在文件末尾添加一个新行,将单元格A7设置为 "SheetJS 开发",将单元格B7设置为47。该工作表应类似于以下屏幕截图:¥Open the file
src/data/pres.xlsxin Excel or another spreadsheet editor. Add a new row at the end of the file, setting cellA7to "SheetJS Dev" and cellB7to47. The sheet should look like the following screenshot:

保存文件并观察表已刷新为新数据:
¥Save the file and observe that the table has refreshed with the new data:

静态站点
¥Static site
-
停止开发服务器并构建站点:
¥Stop the development server and build the site:
npm run build
构建输出将确认 /pres 路由是静态的:
¥The build output will confirm that the /pres route is static:
└ src/pages/pres.js
  └   /pres/

  ╭────────────────────────────────────────────────────────────────╮
  │                                                                │
  │   (SSG) Generated at build time                                │
  │ D (DSG) Deferred static generation - page generated at runtime │
  │ ∞ (SSR) Server-side renders at runtime (uses getServerData)    │
  │ λ (Function) Gatsby function                                   │
  │                                                                │
  ╰────────────────────────────────────────────────────────────────╯
生成的页面将被放置在 public/pres/index.html 中。
¥The generated page will be placed in public/pres/index.html.
-
用文本编辑器打开
public/pres/index.html并搜索 "SheetJS"。将会有一个 HTML 行:¥Open
public/pres/index.htmlwith a text editor and search for "SheetJS". There will be a HTML row:
<tr><td>SheetJS Dev</td><td>47</td></tr>
[^1]: 该软件包的型号为 公共 NPM 注册表中的 gatsby-transformer-excel。它也被列在 GatsbyJS 插件库 上。
¥The package is available as gatsby-transformer-excel on the public NPM registry. It is also listed on the GatsbyJS plugin library.
[^2]: 请参阅 GatsbyJS 文档中的 gatsby-source-filesystem 插件
¥See the gatsby-source-filesystem plugin in the GatsbyJS documentation
[^3]: 见 read 于 "读取文件"
[^4]: 有关 SheetJS 工作簿对象的更多详细信息,请参阅 "工作簿对象"。
¥See "Workbook Object" for more details on the SheetJS workbook object.
[^5]: 见 sheet_to_json 于 "实用工具"